Tag Archive for: maintenance

Repotting 1

Repotting Large Containers

By Susan

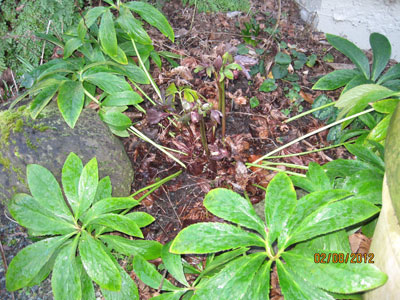
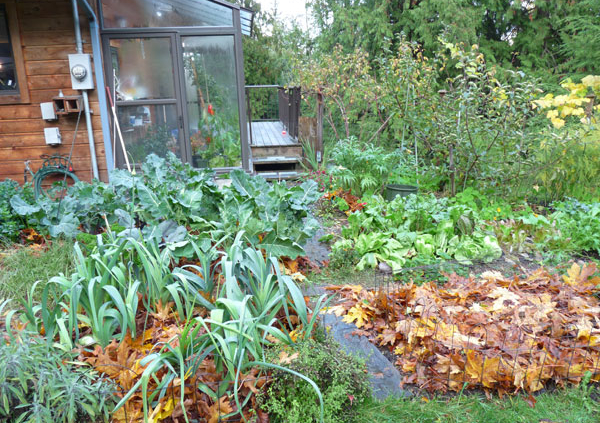
Occasionally Japanese maples, roses, bamboo (especially bamboo!) and other large container plants need to be re-potted. How can you tell if it’s time? If you feel that a particular plant didn’t do so well last year, or that water ran right through the pot without being absorbed, then it probably is. Repotting doesn’t always mean going to a bigger pot. It could just be a case of trimming the roots and replanting into the same pot using fresh soil.

Handling big pots is easier than it looks if you know a few tricks and have someone to help. A day or two ahead of time check the moisture in the containers. It’s easiest to do if the soil is damp right through, but not soggy.

Before you start, you will need some fresh soil. We regularly recommend one of three options:

  1. The easiest is premixed potting soil that has a soil base – avoid light weight peat- based mixes. (We like Growell Sterilized Potting Soil).
  2. Alternatively, you can use a bagged soil like Grower’s Delight Garden Soil mixed 50/50 with bark.
  3. If you prefer to mix your own soi, a blend of equal parts finished compost, bark mulch and good garden soil is ideal.

N.B. Its best to always use sterilized soil for Japanese Maples, as garden soil can harbour harmful fungal spores.

Time to get started! Make clean-up easy by spreading out a tarp to work on.

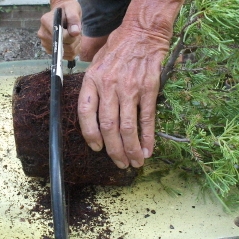
Run a long, sharp knife, like a bread knife, around the sides of the pot. When it seems loosened, lay the pot on its side and carefully pull the plant out. This is easiest if the container has straight sides, but will take much more effort if the sides are curved inwards (a good thing to remember if you are buying new pots). You don’t have to be too gentle at this stage, especially if the plant is dormant. Plants are tougher than you think.

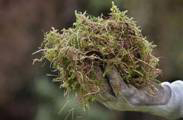
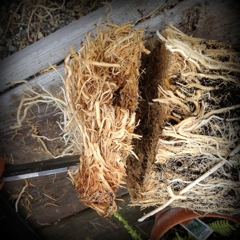
Tease the soil away from the roots with a small hand fork and trim long circling roots. If the root mass is solid, use an old knife, pruning saw or even a Saws All, to cut away a couple of inches from the sides and bottom.

Clean out the container and check that the drainage holes aren’t plugged. Cover them with some screening to keep them open. Mesh dry wall tape or old window screen work well.
Add fresh soil mix to the pot and reposition the plant so that the top of the root ball is at the same level it was before you started- not too deep or too high.
Fill in with the soil mix, to about two inches from the top. Tamp the soil down gently around the roots so there are no air pockets.

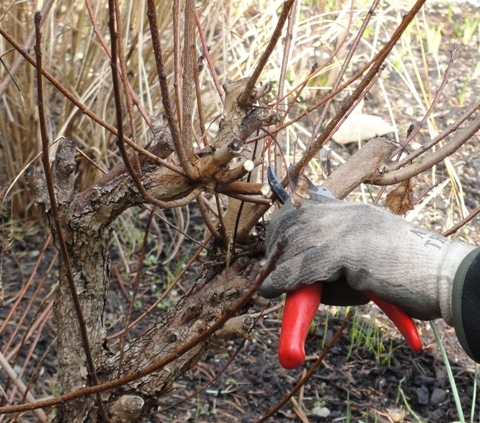
Return the pot to its permanent position. Top dress with a slow release fertilizer and water well. Lastly, prune for shape and to remove any damaged or inward growing branches.

If your containers are too big to move, scrape away what you can of the old soil and top up with some fresh soil mix instead. .


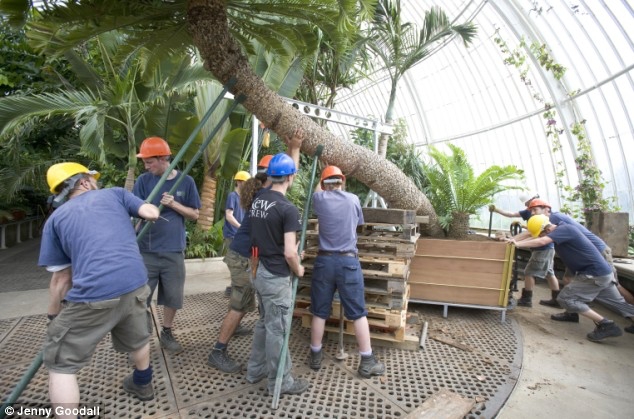
The oldest known potted tree

It’s possible to re-pot anything if you have enough help!

It took nine gardeners, a crane and three months of meticulous planning to place a one-tonne tree, believed to be the oldest potted plant in the world, into a new container.
The ancient cycad, a palm-like tree, was collected from South Africa on one of Captain Cook’s voyages and has been at Kew Gardens since 1775.
It has grown outwards and upwards at an inch a year and now reaches almost 15’. It grows at an angle and is propped up by stilts.

From The Daily Mail


Pear Blister Mite

Start Now To Foil Next Season’s Pests

There is much we can do between now and spring to eliminate or lessen the damage from insects and disease.

We in southern BC are very fortunate to have food-growing expert, author and entymologist Linda Gilkeson, PhD in our midst. She has generously provided the information for this article.(www.lindgilkeson.ca)

TO DO NOW:

      1. Mulch, mulch, mulch! A clean and tidy garden does not provide habitat for the good guys. Leave the leaves in garden beds as a haven for ground beetles, rove beetles, and bumble bees. The largest mortality for winter moths is actually from ground beetles attacking the cocoons while they are still in the soil.
      2. Rabbit Damage

        Rabbit Damage

        Very important if you have rabbits around: protect the lower 2-3 feet of trunk on young trees with chicken wire or other tree guards. Bunnies can kill a whole orchard in a winter by ringing the bark.

      3. Put out safe slug bait containing iron. Slugs are very active in a warm wet winter.
      4. Rake up, remove and destroy all leaves from your roses if they had black spot this year. Do not compost. Rose hygiene is the best defense.
      5. Don’t allow potatoes to keep growing in the garden, that’s where late (tomato) blight can overwinter.
      6. Climbing cutworms are still active on leafy greens. Evening inspection, just after dark with a flashlight, will expose the critters. Pick off and destroy.
      7. People around Victoria should already have sticky tree bands up on their fruit trees and boulevard trees, especially Garry oak, birch, poplar, maple, willow and other broadleaf trees. If not done already, it is still worth doing asap.
      8. Pear Blister Mite

        Pear Leaf Mite

        If you do it right now, you can still spray lime sulphur on your pear trees for pear leaf blister mite, which cannot be reached by dormant sprays in winter. Also useful for peach leaf curl.

*** Please note, only do the lime sulphur treatment if you had problems with these diseases last year. There is no benefit at all treating trees that have not been infected.

*** Stay tuned, we’ll write again in early February with an update on what to do while the trees are dormant.


Rose Pruning 3

Winter Pruning of Climbing Roses

Winter is the best time to prune modern repeat climbers as all the old leaves need to be picked off anyway, so may as well prune at the same time. (Once blooming old roses and ramblers are best when pruned in the summer after flowering)

The key to climbers is to train the canes as near to horizontal as possible. A good structure of horizontal branches dramatically increases the number of flowers. Climbers that are allowed to grow straight up will have flowers only on the tips of the canes. Newly planted climbers won’t need much pruning the first year or two. Just tie in any canes that have developed over the summer and cut side shoots back to about 6 inches.

The rose in this picture would have most of its flowers at the top.

The rose in this picture would have most of its flowers at the top.

To prune an established wall trained climber, start by taking a critical look at the plant’s structure.   Identify two or three of the oldest, less productive canes for removal or cutting back. Decide which of the newly developed canes you want to keep and where they would be best tied in. Look for dead wood, weak thin growth and awkward branches.   Try to make a plan before you start cutting.

Once you have your game plan, start by cutting away what you don’t want. The oldest branches can be cut at ground level, or at a low point where you want a new branch to form. Keep an eye on where the buds are and make the cuts just above buds that are pointing in the direction you want new growth to go in.

Cut out thin weak growth, dead wood and awkward crossing branches. Leave the side branches on the remaining canes for the time being.   Tie remaining canes onto the supports, spacing them evenly to get good coverage. Now prune the side branches, or laterals, growing out of these canes down to 3 or 4 buds. Cut just above an outward facing one.

Rose Pruning 3Remove any remaining leaves, an important step in disease control.   Lastly, rake up any fallen leaves off the ground, lightly fork over the soil around the base of the plant, apply a couple of inches of compost and you’re done.

The steps for pruning a rose trained over an arbour or similar structure are pretty much the same. Try to train some of the branches in “S” curves up trellised sides or wrap them around the support posts. Be sure that the branches over the top of the structure are tied down securely to prevent wind damage and to promote good flowering. Cut back side branches to two or three buds.

Red rose 2

See how this Don Juan Rose is tied to the top of the arbour, producing many side branches and lots of flowers.

moss in lawn

Controlling Moss In Lawns

moss in handMoss thrives in our rainy climate and naturally acidic soils. It loves wet, poorly drained soil and does best in shady spots where the grass struggles to grow. The only way to really solve a moss problem is to determine and remedy the cause.

Drainage: Improve the porosity and drainage of your soil by aerating it. You can rent aerators, but they are heavy and awkward. It’s easier (and often cheaper) to get a lawn company to come and aerate for you. After the lawn has been aerated, spread a thin layer of coarse sand over the aerated areas to fill up the holes. The sand will work its way down and, in time help to greatly improve the drainage. For best long term results this aerating should be done annually.

Shade: Previously sunny parts of the garden can become shaded as trees and shrubs mature. Cut them back or thin them out to allow more light through. If it’s not possible to let in more sun, you may want to rethink the whole idea of lawn and either let the moss take over, or replace the lawn with suitable groundcover.

Acidic Soil: The best way make soil less acidic is to raise the pH, and the easiest way is to apply lime. Dolopril is the best type of lime to use as it’s easy to apply and it works quickly. Typically lime is applied in the spring, but it can also be applied in the fall when it will help to prevent the growth of moss over the winter.

Moss Killer: Once you have changed the conditions that promote the growth of moss, and increased the pH level, it is time to get rid of the moss. Lawn fertilizer with iron sulphate will kill the moss and feed the grass at the same time. For best results the forecast should be for a couple of days of dry weather with temperatures above 10 degrees. When the moss killer has done its job, rake out all the old dead moss.

Maintaining a healthy lawn will make it harder for the moss to re-grow. Plus, it makes it difficult for weeds in general to take hold. Re-seed any bare patches and fertilize regularly over the spring and summer. We like to recommend Milorganite, which is organic and promotes good microbial activity in the soil, which in turn makes the grass grow lush and green. Water at least enough to keep the grass from browning out.

Don’t forget: moss spreads by spores, so complete the process by trying to clean up the moss from other areas of the garden like the roof, sidewalks and under shrubbery.

kale leaf with aphids

Tending Your Winter Vegetables In October

Mid October has finally brought the first rains of the season, as we say goodbye to the lovely, long late summer.  Has there ever been a fall as gorgeous as this one?

The extended fall has unfortunately enabled those evil white cabbage moths to produce yet another generation of their voracious offspring.  Even today, I found several of the green hairless caterpillars munching on the leaves of my Lacinato Kale. Oddly enough, the Red Russian Kale seems unscathed.

Kale leaf with aphids

I was away for 10 days!

Aphids as well have had another chance in this warmth. Their veggie of choice appears to be the Purple Kale.  If it’s not possible to blast them off with the hose, a good squishing does the job.

Kale leaf with aphids

Keep inspecting both sides of the young leaves; while insects aren’t generally a problem for winter gardening, the young plants in a warm fall will fall prey to these very hungry munchers if you aren’t vigilant.

At this time of year, there is no point adding compost or granular organic fertilizer, as the microorganisms that convert these organics into usable food for the plants are dormant. It’s a better idea to feed frequently with liquid organics, alternating weekly with fish and seaweed dilutions while the plants are still small.

The whole point is to get your winter vegetables off to a good strong start before the cold weather really sets in; ideally they should be almost full size by Halloween.  Don’t worry if yours are smaller than this, they’ll just produce a little later in the spring

Any of the taller winter vegetables, such as Purple Sprouting Broccoli or Brussels Sprouts will benefit from staking; these are quite top heavy and subject to wind lash.

Gather up fall leaves and mulch the veggies well, covering the soil with about 4” of loosely piled organic matter. When the storms of November toss piles of seaweed onto the beach, I like to bring some of this nutrient-laden bounty home, and add to the leaf mulch on my vegetable beds.

By the way, next time you are at the nursery, stop by our working greenhouse by the driveway, and see the staff veggie garden all tucked in for the winter, and enjoy seeing it mature over the coming months.  Swiss Chard, Kale, Spinach, Green Onions, Mache and Purple Sprouting Broccoli—what a feast!

cotinus during v1

Spring Haircuts For Shrubs: Pruning To Avoid ‘Bad Hair Days’

I look back with horror on how I used to prune my shrubs. Akin to a “bowl cut” for hair, basically I just trimmed off the ends of branches to keep shrubs the size and shape I wanted, resulting in a “witches broom”, a scary hairstyle indeed. Alternatively, I didn’t prune at all, favouring the wild and wooly look.  It’s embarrassing to think of the Buddleia that I had to support with  a complicated rigging of stakes and twine. Then I took a 4-session pruning class with Patty Brown, at the Horticulture Center, and my gardening life changed. Always ask yourself ‘Why do I want to prune this plant?’ Here are three of the main reasons. Training—To direct the growth in a direction that you choose. Cut to a bud which faces in the direction you want the branch to go. Maintenance To enhance the health of the plant. Removing dead, diseased, or damaged wood (the famous DDD); removing branches that cross, rub, or otherwise impinge on the space of their fellow limbs; increase air circulation. RejuvenationThis is often drastic and requires experience. Don’t attempt to do this all in one year; the process may take several years, with some rejuvenation pruning done each year on an old, decrepit and suffering plant. Sometimes better to buy a new one.

The joke in the class was that we had to prune all of our deciduous shrubs on March 1 at 2pm; a rule meant to be broken, but a guideline to follow. The rationale is that the sap is about to flow, bringing food and energy gushing to the freshly cut branches, stimulating new growth.   Pruning in the dead of winter when it’s cold and wet can invite rot on the cut surfaces, so March 1st gives the best of both worlds; the plant is dormant but growth is about to begin for the new season.

To prevent loss of the current year’s bloom, follow the adage “If it blooms before June, you don’t have to prune.”  Well, you do have to prune, but not now.  Wait until after flowering to prune your spring bloomers. We learned that there are only two main types of pruning; heading back, and thinning. That witches broom I mentioned is from heading back incorrectly.

This hydrangea will be both headed back, (cut to a fat bud on the bare stem) and thinned as well (by cutting out one quarter of the oldest branches to the ground).

Heading back is to shorten branches, direct growth, or maintain size, but is also used to keep some shrubs tidy and full, as in shearing hedges or small-leafed evergreens such as boxwood, heather, etc.  Remember that at any cut point, new growth will erupt, so you must decide whether you want a burst of new green, or just a more controlled response.  I have a Rose Glow Berberis right beside a pathway, and if you’ve ever crossed swords with one of these, you’ll understand the value of heading back in a responsible way, to keep it within bounds but not encourage rampant re-growth. I always shorten the branches by cutting to a smaller side branch that is aimed away from the path.

Many of our favourite shrubs benefit from being totally cut back every year, in a technique called coppicing, which is a fancy word for cutting off all the branches just above ground level (a severe form of heading back). This encourages strong new growth, and bountiful bloom on the ones that flower on new wood such as Lavaterra, Buddleia, Leycesteria Formosa (Himalayan Honeysuckle), Hydrangea arborescens eg Annabelle,  Hydrangea paniculata eg Limelight.

Think of how much energy this Buddleia has wasted putting on these leaves. The pruning should have been done a few weeks ago.

All ready to start growing.

The very popular red-twigged dogwood, Cornus stolonifera, is another candidate for coppicing, as the new growth is always much redder and more vibrant. A newly coppiced Cornus will sprout new red growth quickly and make a much more stunning specimen in the following winter.

Thinning cuts are exactly that; meant to thin an overcrowded shrub by removing branches at their point of origin —either at the ground, from a larger branch, or from a Y-joint junction.  Entire shrubs can be gradually renewed by taking out one quarter of the oldest branches, to the ground, each year.

Broadleaf evergreens can also be pruned now unless flowering is an issue. This is usually done by heading back, ie. as in maintaining a hedge, or with thinning cuts to eliminate crowding.  The burst of new spring growth will cover up any stumps or stubs. Pruning at this time of year gives us the gardening fix that we so need, and only ‘good hair days’ for our shrubs.

Cotinus before coppicing

Cotinus being pruned

Coppiced cotinus.

hellebores needing cutting

Late Winter In The Garden; Hellebores And Epimediums

It’s very tempting to call this Early Spring, but let’s not risk jinxing it.  CBC even threatened possible snow for next weekend, so I’ll be careful what I say.  Was it my thought of starting some seeding that brought back the cold weather??

It’s still very wet and muddy out there, so there shouldn’t be a lot of stomping around on the soil yet. However, there are a few tasks that should be done before the warmth progresses much further.

If you read my blog last year at this time about cutting back ferns,  you’ll remember how important it is to cut evergreen plants back before the new growth emerges, lest you cut off the new with the old.

Epimediums are a particularly useful ground cover; they thrive in dry shade, deer find them unappetizing, and they are evergreen.  What’s not to love? The dainty leaves take on a burnished bronze in winter, then just before spring they need to be lopped off in preparation for new growth. The key is to cut it all back just before the delicate little flower stems reach up into the canopy of leaves. The emerging stems unfurl, not unlike the way fern fronds uncoil, from a crouching position to standing  tall; well about 8” tall, anyway.  This seems to happen all of a sudden, and if the leaves aren’t already cut back, it’s impossible to separate the two, resulting in flower buds lying sadly on the ground with last year’s leaves.

Epimedium With Bud

In the dark days of February the light isn’t conducive to great photo shoots in my garden, but here you can just see the first little brave bud starting its journey skyward, after the leaves had been shorn. Within a few days, many more buds will follow.

Is there any more welcome sight in winter than the charming faces of Hellebore blooms? Modern hybrids offer not only a vast assortment of colours from pink to yellow to purplish black to pure white, but the outward facing blooms on sturdy upright stems make these gems irresistible.  They are very drought tolerant once established, do well in shade as well as sun, and the deer don’t eat them.

They don’t like being divided, are a low maintenance perennial with few pests. The one thing you do need to do at this time of year however, is to cut off the ratty leaves when the plant is blooming, as this is when the new foliage is emerging.   The old leaves become leathery and lay on the ground at this time, making it easy to see what to cut.   Don’t put the hellebore leaves in your compost, as a precaution against the black spot fungus that hellebores often get on old foliage.

Hellebores Needing Cutting

The picture shows the big glossy leaves surrounding all the new growth. Cut off all the big leaves, as hard as this may be to do!

By keeping your perennials cut back at the right time of year, you are refreshing and renewing the life of your garden, and giving yourself the much needed boost of a little time in the garden at a very dark time of year.

How soon until we can safely call this Early Spring? One thing we can do without harm, I think, is get our seeding trays washed and check our supply of seeds from last year, buy some choice new ones…..…next week, seeding indoors. 

linda yard mulch2 web fmt

Amending Your Soil For Winter

We are all used to a blanket making us cozy and warm in the cold days of winter, but feeding us too? Well that’s what winter mulch can do for your garden; nourish the soil and protect it from rain and freezing temperatures.

It may seem mysterious, but really all you need to do is provide lots of organic matter to feed the millions of microorganisms that will convert nutrients to usable food for the plants.  These little organisms will slow down for the winter, but by putting the mulch down in the fall, it’s already broken down by spring when the warmth wakes the little critters up and they can get to work right away. Usually we also have to correct the pH here, as our winter rains tend to make the soil more acid. With the exception of strawberries and potatoes, most veggies need a higher pH so the addition of dolomite lime in the fall is a good thing to do.  Of course the ericaceous plants (acid-loving) such as rhododendrons, camellias, heathers, pieris, and conifers are happier without the lime.

The easiest, cheapest, and most effective form of organic amendment is right there in your yard already; falling leaves need only be raked and layered in the beds; ideally, mow them on the lawn and dump onto the garden beds, both ornamental and veggie, but even just dumping them on in a 6” layer is fine, as long as they are nice and fluffy and not likely to pack down. Oak leaves are especially wonderful for the acid-lovers.  The practice in our culture of placing autumn leaves in a pile or plastic bag for the municipality to gather and sell back to us as compost is bizarre. Do you ever see forests needing fertilizing? Of course not, the leaves fall, they decompose, and return their nutrients to the soil, which feeds the trees and the cycle is repeated.  While you’re at it with the leaves, bag some up and save for spring and summer, when the “brown” part of composting is in short supply. You’ll be happy to have these crispy crunchies to add to your mostly-green compost, and the microorganisms in your soil will thank you.

By leaving the leaves in your garden beds, not only do you feed the soil and suppress weeds, you provide a haven for beneficial insects.  The lovely bumble bee nests in fallen leaf litter in garden beds.  One of the many pleasures of spring is seeing the groggy bumbles stumbling around when first awakening from their winter naps, going from crocus and heather to sarcococca, feasting on nectar and pollen

Leaf Mulch On Vegetable Beds

Here is a photo of Linda Gilkeson’s veggie garden, freshly topped with autumn leaves. As the queen of vegetable gardening on the coast, Linda offers her wisdom and practical experience in her book Backyard Bounty.  I really don’t think there is a better Christmas gift for anyone on your list who wants to grow food; talk about a gift that will keep on giving!

Another form of organic wealth I like to feed my garden is seaweed. As I live near several beaches, I am able to visit the local shoreline after a big November storm, and gather the seaweed that has washed up on the beach, detached from any living ocean plants. I don’t bother to rinse the seaweed as we have a lot of rain, nor do I even chop it up, I just pile it onto the garden beds to decompose, it seems to melt right into the soil, providing many important benefits; increased hardiness, resistance to disease, and better fruit production for many favourite crops. (Local biologists recommend rinsing the seaweed at the beach to make sure you are leaving all living creatures behind. If you are using a lot of seaweed it is probably worth freshwater rinsing, the salt in the seaweed will deter slugs but also the beneficial earthworms .) You will never find a more valuable resource for your garden! In the absence of a nearby beach, or if you aren’t comfortable hauling buckets and buckets of slimy kelp in your car, we do sell bags of kelp meal, as well as a powdered form of seaweed that can be diluted and makes an almost endless supply of seaweed elixir to foliar feed or root drench.

If you’ve been following my blogs at all, you will know that I’m a strong believer in the wonders of straw as mulch too. Straw improves the tilth of the soil, and as it breaks down, it provides carbon for the nitrogen-carbon ratio that we seek for our composts.  Its texture keeps the soil open, allowing the rains to drain through but not pummel the soil throughout winter.  Make sure it’s straw that you buy, not hay which is inclined to be full of weed seeds.

The ultimate treat for gardens is of course compost, but the recommendation is to leave the compost covered and in the bin for winter, staying relatively dry and warm.  Save it for spring mulching, preserving the nutrients that would be washed away by the winter rains.  The same is true for fertilizers; wait until spring, whether you choose organic blends or synthetic additives.

Such a combination will ensure a happy and well-fed soil, awaiting the warmth of spring. Bring on the seed catalogues!

compost tea operation

Some Compost Tea, A Bale Of Straw, And Thou

With profound apologies to Omar Khayyam; we’ve come a long way since the 11th Century.

Compost tea and straw are elixirs for the modern gardener.  Better than that “jug of wine, a loaf of bread and thou”?  Uh, maybe not, but much appreciated by your happy plants.

Compost tea is just about the easiest thing to make; it can be as simple or as complicated as you wish to make it.  Sure, if you Google ‘compost tea’ you’ll find places to buy it, sources for expensive bubblers and aerators, and these are all wonderful no doubt.

Compost tea operation.

However, my version is just like the bag-in-a-cup way of making real tea; a shovelful of good compost in a 5 gallon bucket, fill with water (ideally rainwater, but second best is to allow the water to sit for a day or two to dissipate the chlorine, but I’ve never had the patience for that), and allow to steep for 3-5 days, stirring daily to incorporate oxygen into the brew. Any longer than that, without an aerator, there can be too many anaerobic organisms and a never-ending supply of mosquito larvae!
When ready to use, stir vigorously, muttering incantations to the moon of course, allow the solids to settle, and scoop. I keep a yogurt container handy, scoop some into my watering can, and fill the can with water.

Depending on what I’m watering, i.e. seedlings or my established perennials, I’ll dilute or not. Full strength is a real treat for shrubs and all other plants, but it can be diluted up to 1:5 ratio with water, and still be an energizing fix for the hungry plants.

To make the tea even more deluxe, you can add a few cups of alfalfa pellets, or a good slosh of liquid seaweed. The alfalfa adds nitrogen, and the seaweed contains about 60 micronutrients, beneficial fungal foods, and plant growth hormones.

Used as a foliar feed or soil drench, the tea feeds a very nutritious tonic to the plants, inoculates the soil with beneficial bacteria and fungi, and helps control plant diseases. Add the remaining sludge back to your compost to return an active community of microorganisms to the pile.  Recycling at its best.

Needless to say, there are hundreds of sources for more information, but I like this one:

http://faq.gardenweb.com/faq/lists/organic/2002082739009975.html

He claims that there are enough aerobic bacteria and fungi in a good 5 gallon batch of compost tea to equal the benefit of 10 tons, or 40 cubic yards of good compost. Well, I can’t prove him right or wrong, but it sounds good to me.

***PLEASE DO NOT LEAVE YOUR BUCKET WHERE A SMALL, CURIOUS CHILD COULD TIP INTO IT***

Every Spring, I buy myself a bale of straw. The local supplier of animal feeds and farm supplies sells bales in two sizes, and I always get a good-sized bale as I find it has many uses in the garden.

In these days of water conservation, a mulch of straw in the vegetable beds keeps the soil nicely moist and warm, and as it breaks down it provides wonderful humus and porosity to the soil.  Mulches in general protect the soil from driving rain (or sprinklers), prevent a crusting-over in the sun, and keep it from blowing away in the wind. Straw is inexpensive, widely available, and will break down over the year. Some people prefer to buy it in the fall and open it to the rain, to start the breaking down process. Certainly when it’s nicely wet it is much easier to control when spreading. In fact, even if you buy it in the spring, wet it thoroughly to facilitate spreading; it’s not possible to control the dry stuff on a windy day!

Straw mulch for the ground and containers.

By the way, don’t buy hay instead of straw, it’s full of seeds.

Many avid vegetable growers use straw as a covering for pathways between rows, blocking the sun from the nasty weed seeds, and as part of a winter mulch program along with seaweed, organic fertilizers, and lime.

By putting a generous layer of straw around my strawberry plants, the slugs seem to be discouraged, and the berries remain clean, all the better to eat while standing in the garden.

Another wonderful use of straw is in the making of Lasagna Gardens; another topic for another day…

For now, I’m off to enjoy that jug of wine and loaf of bread………some good cheese……….strawberries and raspberries from my straw-mulched beds………..

backlit fern

Spring Haircuts for Evergreen Ferns

Every spring I look forward to the ritual of cutting back my evergreen ferns. Although it won’t harm them to leave them alone, by cutting off the old growth you make room for the fresh new fronds to show through.  As soon as the soil warms enough to start the new growth, you will notice small “knuckles” forming at the base of the existing fronds, at the crown of the plant. This is the precise moment to get secateurs or hedge trimmers in hand, and cut off all the old growth. It’s hard to cut off old fronds that still look good, but you will be happy you did.

Uncut Sword fern

Polystichum munitum, or Western Sword Fern, is a classic example. In this picture, you can see it without the haircut, showing the new fronds starting to unfurl amongst the old ones.

Cutting off the old stems after the new ones emerge is fraught with danger and requires a patient hand; the risk of severing the new fronds is high.  It’s a lot easier to do before the new growth comes in!

Partially Cut Fern

I photographed this one partially trimmed to show you the density of the new growth, with the lush old growth still standing.

In a large fern such as this one, the choice is a dense thicket of crowded fronds, or a fresh abundance of spring green.

I love the way the “knuckles” become furry “fingers” as they reach for the light.

While the Sword Fern is a natural for this treatment, don’t be afraid to do it to other ferns in your garden, they can all benefit by a close haircut each spring. My Alaska Fern (Polystichum setiferum) hadn’t been trimmed for a few years, so when I cut it back this year there was a lot of nasty brown litter crowding the crown.

Alaska Fern

I had to be quite ruthless, but I think the cleansing will do the plant good, and I’ll enjoy the greener vista along my pathway.

My Asplenium scolopendrium, or Hart’s Tongue Fern, is in a pot under the big oak tree, near many hostas, hellebores, and other shade plants. It too was starting to look leathery and tired.

Maintenance of perennials makes the difference between a garden that looks worn out and sad, or one that bursts with new vibrant growth. Trim back your ferns, and you too will enjoy the special beauty and majesty that this ancient plant brings to horticulture.

Backlit Fern