Lasagne Gardening

Putting the Garden to Bed, Lasagna Style!

By Faye

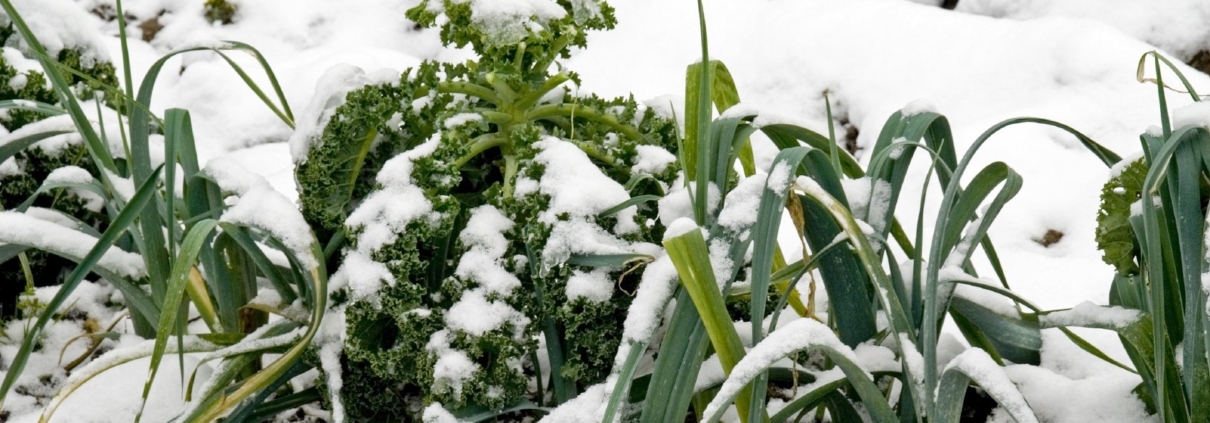
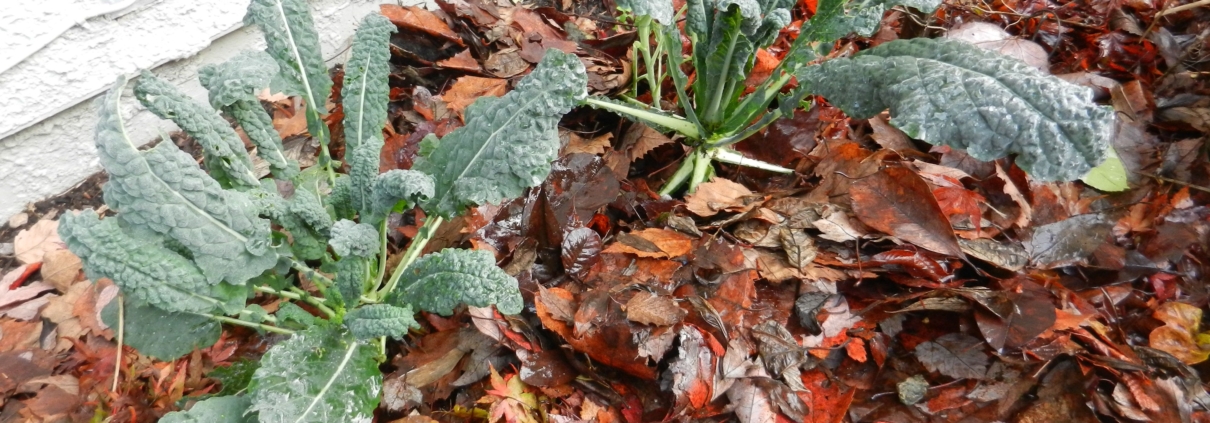
With shorter days, colder nights and the last glorious fall colours fluttering to the ground, my veggie beds are tucked in for their winter sleep. Most of us know about ‘lasagna gardening‘ (just Google it) for building new beds but I decided to use this method to give my hard-working soil an extra treat this year.

1. Lime and straw

After emptying out the remnants of summer bounty, and working around the areas still laden with carrots and beets, I limed the soil then topped the empty beds with a layer of straw.

2. Manure and leaves

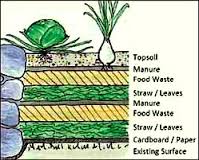
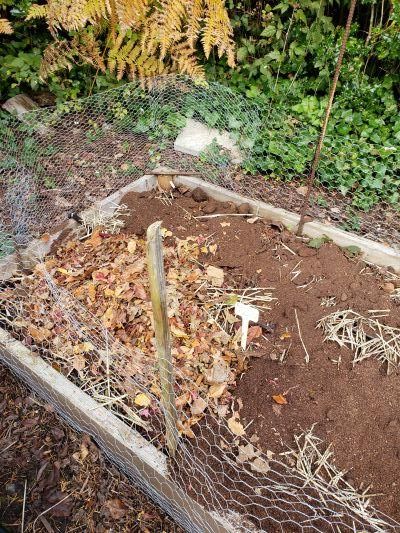
My first ‘green’ layer was well-aged chicken manure from Firbank Farms on Island View Road, then for the ‘brown’ ingredient, I added a thick layer of precious leaves. Lasagna gardening focuses on alternating layers of ‘green’ (nitrogenous) with thicker layers of ‘brown’ (dried, carboniferous) amendments. 

On top of the leaves, I put a 2-3″ layer of my own freshly dug compost. Having been too busy to dig it last spring, I left it and the summer warmth produced my best compost ever! Yes, good black compost is considered ‘green’, as is manure.

3. Top with compost and leaves

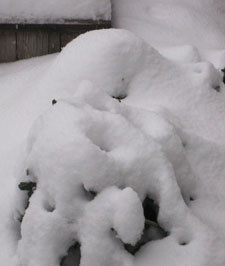
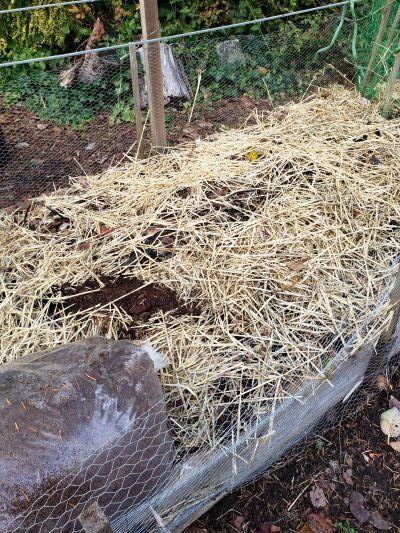
With a final, generous frosting of more autumn leaves, my soil beds are now piled higher than the raised beds themselves, but the army of microorganismsearthworms and their friends working beneath the surface will have this digested and shrunk down by planting time in mid-spring. What isn’t broken down by then will provide extra humus and help keep the soil moist all summer.

4. Bed ready for its winter sleep

I anticipate much gratitude from my newly-restored soil in the form of bountiful crops next year.

*NOTE: If you didn’t get to do this yet and winter arrives, save those leaves and start layering in the spring! It’s never too late. If done in spring, consider adding some topsoil so you can just plant right into the layers.

Winter veg bed

What to Do Now with Winter Veggie Beds?

By Faye

If you, like me, are admiring your nicely established winter crops in the garden, then it’s worth the little bit of time it takes now to make sure everything stays healthy throughout the cold season. Mulching and some staking are needed to protect winter crops from the elements.   It’s been a while since we’ve seen snow, but who knows what this winter will bring. Read on for details…

Winter rains are a welcome sight as our parched ground absorbs the needed moisture, but pounding rains are hard on the soil. Protecting the soil from erosion and leeching is very simple; just add a 6” top dressing of fluffy autumn leaves. This also prevents the splash-up of soil onto your plants, helping to keep them disease-free, in addition to giving some protection from slugs.

purple-sprouting-broccoli-snow

Purple sprouting broccoli is tough but it would be flattened if not staked

Don’t waste your compost; leave it in the bin, covered and relatively dry, to await spring warmth which is the wake-up call to the micro-organisms to start their work of digesting the organic waste, converting it to usable plant food. Spreading it on the garden in fall results in its goodness being leeched out and washed away in the rain.

Stake your brassicas. While kale and other brassicas are very hardy, they do tend to be brittle, while purple sprouting broccoli and Brussels sprouts are top heavy. A very sad sight is a tall vegetable toppled over in the wind, when it’s so easy to protect with a sturdy stake or two.

Watch out for caterpillars (still!) I neglected to net my Brussels sprouts with ProTekNet, and you can see the results here, the fat cabbage worm has been feasting. If you haven’t done so already (ideally in September), be sure to pinch out the top cluster of leaves, stimulating formation of the sprouts all along the stem. Leave the plants in the ground, and harvest sprouts as needed after frost, when they will be at their sweetest.

cabbage-worm-on-b-sprouts

Cabbage worm feasting!

Protect your shoulders. There is nothing better than pulling fresh carrots and beets during the winter, but if the shoulders get frozen they can turn to mush. When cold weather arrives, having a few inches of leaves in the bed will insulate the roots, and when it does get below freezing it’s easy enough to pull the leaves up and over the shoulders of the vegetables, especially the cylindrical beets which tend to push themselves up and out of the ground.

Stockpile mulches. Gather as many leaves as you possibly can; rake your own, take bags from the road side, do what you can to have a vast supply. Keep some for next summer in a plastic bag to keep them dry, adding to the compost alternately with layers of green. Put some in bins to decompose into leaf mold, truly black gold.

Lime the empty beds so they will be ready to plant by spring. While this can wait until spring, why not get it started now? Keep track of what beds you lime, and when; this needs doing only once a year, and never in beds that will be used for strawberries or potatoes.

Spinach and Chard have softer leaves, and can do with some winter protection during heavy rains and colder weather. I grow both in the greenhouse, but a tunnel or cold frame give protection from harsh conditions.

Plant garlic. Fall is the best time to plant garlic so the roots are well established for bulb growth in the spring.

Sit back and let Mother Nature do your watering, but keep an eye out for critter predation, slug damage, and extremes of temperature. Eat your veggies!

Viburnum bodnentense

SOME PLANTS THAT SHINE IN THE WINTER

By Patty

Latin Name Common Name Plant Type Attractive Features Peak Conditions
Berries and Seedheads
Aronia melonocarpa ‘Autumn Magic’

Choke Cherry

deciduous shrub fall colour, shiny black berries Oct-Jan sun/p.shade
Callicarpa bodinieri ‘Profusion’ “Beauty Berry” deciduous shrub unique colour of purple berries Oct-Dec sun/p.shade
Cornus mas “Cornelian Cherry” deciduous shrub red berries in fall, spidery yellow flowers in Feb. Nov-Mar sun/shade
Cotoneaster sp. evergreen & deciduous many varieties, orange, red and yellow berries Nov-Feb sun/avg H2O
Garrya elliptica ‘James Roof’ “Silk Tassel Bush” evergreen shrub leathery green leaves, long catkins Dec-April sun/p.shade
Iris foetidissima “Stinking Iris” evergreen perennial bright orange berries burst from seed capsules Oct-Jan sun/shade/DT
Mahonia x media ‘Charity’ “Oregon Grape” evergreen shrub spiky foliage, yellow flowers on erect spikes Dec-Feb shelter hot/cold
Pyracantha spp. evergreen shrub red, orange or yellow berries, wall train is best Oct-Feb sun/p.shade
Skimmia japonica evergreen shrub bright red berries, needs male & female Nov- Feb shade
Symphoricarpos x ‘Magic Berry’ “Pink Snowberry” deciduous shrub pink berries, suckering habit Oct-Dec sun/p.shade
Viburnum davidii evergreen shrub metallic blue berries, pink flowers Oct-Jan sun/shade
Coloured Bark and Stems
Acer griseum “Paperbark Maple” deciduous tree cinnamon brown peeling bark year round prefers full sun
Acer palmatum ‘Japanese Sunrise’ “Japanese Sunrise” deciduous tree bright coral red stems Nov-Mar part shade
Acer palmatum ‘Shidiva Gold’ “Shidiva Gold” deciduous tree bark bright pea green for winter contrast  sun/p. shade
Acer palmatum ‘Bijou’

Japanese Maple

deciduous tree bright yellow/orange bark sun/p. shade
Acer pensylvanicum “Striped Bark Maple” deciduous tree green bark with white stripes Nov-Mar part shade
Betula jacquemontii “Himalayan Birch” deciduous tree chalk white bark year round sun/p. shade
Cornus alba ‘Siberica’ “Redtwig Dogwood” deciduous shrub fiery crimsom upright stems Nov-Mar sun for best colour
Cornus sanguinea ‘Midwinter Fire’ “Bloodtwig Dogwood” deciduous shrub orange – yellow to red stems Nov-Mar sun for best colour
Cornus stolonifera ‘Flaviramea’ “Yellowtwig Dogwood” deciduous shrub bright yellow green stems Nov-Mar sun for best colour
Edgeworthia chrysantha “Paper Bush” deciduous shrub attractive bark & fragrant yellow flowers Dec-April sun/p.shade
Salix ‘Flame’ deciduous shrub orange , bronze stems Nov-Mar sun
Flowers & Fragrance
Daphne odora “Winter Daphne” evergreen shrub exceptionally fragrant pink tinged white flowers Jan-Mar p. shade
Edgeworthia chrysantha “Paper Bush” deciduous shrub attractive bark & fragrant yellow flowers Dec-Apr sun/p.shade
Hamamelis spp.

Witch Hazel

deciduous shrub fall colour, fragrant flowers, yellow, orange, red Year round sun/p.shade
Iris unguiculars “Algerian Iris” evergreen perennial blue with yellow tinge flowers Dec-Jan sun, dry
Lonicera fragrantissima “Fragrant Honeysuckle” deciduous shrub very fragrant white flowers Jan-April sun/p.shade
Sarcococca spp. “Sweetbox” evergreen shrub small white flowers Feb-March Year round p.shade/shade
Viburnum bodnantense ‘Pink Dawn’

Dawn Viburnum

deciduous shrub long lasting fragrant pink flowers,attractive bark Nov-Feb sun/p.shade
Corms and Bulbs
Anemone nemorosa ‘Flore Pleno’ spreading corm double white flowers, summer dormant Mar-Apr p.shade/humus soil
Cyclamen coum spreading corm magenta pink or white flowers, marbled foliage Dec-Feb p.shade/shade
Eranthis hyemalis “Winter Aconite” spreading corm bright yellow flower, summer dormant Jan-Mar p.shade/shade
Iris reticulata hybrids bulbous perennial white, yellow, blue, purple flowers to 12″ Jan-Feb sun/ p.shade
Muscari sp. “Grape Hyacinth” bulbous perennial many varieties, white, blues, voilet Mar-Apr sun/ p.shade
Nerine bowdenii bulbous perennial faintly scented pink flowers Oct-Nov sun/shade
Scilla siberica ‘Spring Beauty’

Squill

bulbous perennial deep blue flowers to 6″ Mar-Apr sun/p.shade
Schizostylis coccinea “Crimson Flag” bulbous perennial white or pink flowers – divide often Sept-Dec sun
Great Foliage & Flowers
Adiantum venustum “Himalayan Maidenhair Fern” evergreen fern creeping rhizomes, black stems, delicate Year round light – deep shade
Arum italicum “Lords and Ladies” tuberous perennial bold arrow shape leaf, orange berry spathe Sept-June p.shade/shade
Asplenium scolopendrium “Hart’s Tonque Fern” evergreen fern bright green shiny fronds Year round p. shade
Cryptomeria japonica ‘Elegans’ Plumosa Japanese Cedar” conifer soft feathery foliage, turns bronze in winter Year round sun/dappled shade
Elaeagnus pungens ‘Maculata’ evergreen shrub boldly marked yellow centres on leaf Year round sun/p.shade
Helleborus argutifolius “Corsican Hellebore” evergreen perennial pale green flowers, bold grey green foliage Year round sun/p.shade
Helleborus foetidus “Stinking Hellebore” evergreen perennial bell shaped green flowers with purple margins Year round p.shade
Helleborus orientalis

Lenton Rose

evergreen perennial many flower colours from green, white to black Year round p. shade
Libertia peregrinans “Bronze Sword’ evergreen perennial spikey bronze-green foliage, orange seedheads Year round sun/p.shade
Ophiopogon planiscapus ‘Nigrescens’ “Black Mondo Grass” evergreen perennial black grass-like foliage, black seedheads Year round sun/p.shade
Phormium tenax ‘Yellow Wave’ “New Zealand Flax” evergreen perennial bright yellow variegated strap-like leaf Year round sun/p.shade
Polystichum setiferum   evergreen fern soft feathery dark green fronds Year round light – deep shade
Branch Structure and Form
Corylus avellana ‘Contorta’ “Contorted Hazel” deciduous shrub corkscrew branches and golden catkins Nov-April sun/p.shade
Hamamelis sp. “Witch Hazel” deciduous shrub fragrant, fine spider-like flowers, fall colour Jan/Feb sun/p.shade
Parrotia persica

Persian Ironwood

deciduous shrub fall colour, great branching structure, silhouette Oct-April sun
Salix matsudana ‘Tortuosa’ “Contorted Willow” deciduous shrub twisted stems, yellow green catkins Nov-April sun/p.shade
Hellebore Tutu 400x

Irresistible Hellebores

By Susan

Hellebore 'Tutu'

Hellebore ‘Tutu’

It’s hard to resist the siren call of hellebores.  Winter blooming, in a wide variety of colour and form, they are long lived and don’t even need dividing. All that and they are both drought tolerant and deer resistant! No wonder we love them.  They are the most collectible of plants.

Helleborus niger aka Christmas Rose and H. orientalis aka Lenten Rose are the species we are most familiar with.  Hellebores seed themselves freely and are notoriously variable.  That variability has long fascinated plant breeders, who had to grow their different coloured plants miles apart from each other in order to have some control over pollination.  Growing hellebores was always a bit like hosting a pot luck dinner, they never knew what they were going to get.

The real challenge though, comes in duplicating hellebores.   It’s only relatively recently, thanks to new techniques like tissue culture, that hellebores have been readily available commercially.  Hellebore varieties are still often sold as ‘seed strains’, meaning that one will be similar to others in the group, but rarely the same.  They have become complex hybrids, known botanically as Helleborus x hybridus.

Separating Seedpods

Seedpods are individually bagged and collected by colour strain.

Hellebores have come a long way from their original murky shades of pink and white, thanks to breeders like Marietta O’Byrne from Oregon’s NorthWest Garden Nursery.  Her ‘Winter Jewels Collection’ features doubles and singles, rich colours and intricate patterns which result from hand pollination and careful selection.  Even their names are irresistible – ‘Berry Swirl’, ‘Onyx Odyssey’, ‘Golden Lotus’,  ‘Apricot Blush’ to name a few; they even sound enticing.  The colour and form of each plant will be similar to others in the strain, but again, rarely identical.
Through successive generations the colours become more stable, and the strains improve.  Hellebores can be expensive, but considering the amount of work that goes into producing them and the fact that they will live for years, they can be considered an excellent investment!

The Same But Different:

Onyx Odssey

Onyx Odyssey

Hellebore 'Berry Swirl'

Hellebore ‘Berry Swirl’


How to Grow Hellebores
We think of hellebores as woodland plants, but in their native Eastern Europe they are found growing in open sunny meadows in alkaline soil.   They are very adaptable though, and will thrive in a lightly shaded acidic woodland.  Although they are drought tolerant, hellebores are at their best in moist, rich, well-drained soils.  At planting time, dig in plenty of leaf mould, garden compost or mushroom manure.   Additional feeding is not usually needed, but an occasional application of a balanced slow release fertilizer won’t hurt.  Mulch occasionally in spring with compost.

It’s a good idea to cut off all the old foliage just as the flowers are starting to emerge.  For one thing, the flowers will show better when the foliage is cut away, but the main reason is to keep the plants healthy.  By spring the old foliage is ratty looking and buggy.  Removing it will allow the new foliage to stay clean.  Put the old foliage in the garbage, not the compost.

Warning: Buying hellebores can be habit forming and can lead to obsession!

If you are interesting in exploring the world of hellebores the Plant Delights website is a great place to start


Pear Blister Mite

Start Now To Foil Next Season’s Pests

There is much we can do between now and spring to eliminate or lessen the damage from insects and disease.

We in southern BC are very fortunate to have food-growing expert, author and entymologist Linda Gilkeson, PhD in our midst. She has generously provided the information for this article.(www.lindgilkeson.ca)

TO DO NOW:

      1. Mulch, mulch, mulch! A clean and tidy garden does not provide habitat for the good guys. Leave the leaves in garden beds as a haven for ground beetles, rove beetles, and bumble bees. The largest mortality for winter moths is actually from ground beetles attacking the cocoons while they are still in the soil.
      2. Rabbit Damage

        Rabbit Damage

        Very important if you have rabbits around: protect the lower 2-3 feet of trunk on young trees with chicken wire or other tree guards. Bunnies can kill a whole orchard in a winter by ringing the bark.

      3. Put out safe slug bait containing iron. Slugs are very active in a warm wet winter.
      4. Rake up, remove and destroy all leaves from your roses if they had black spot this year. Do not compost. Rose hygiene is the best defense.
      5. Don’t allow potatoes to keep growing in the garden, that’s where late (tomato) blight can overwinter.
      6. Climbing cutworms are still active on leafy greens. Evening inspection, just after dark with a flashlight, will expose the critters. Pick off and destroy.
      7. People around Victoria should already have sticky tree bands up on their fruit trees and boulevard trees, especially Garry oak, birch, poplar, maple, willow and other broadleaf trees. If not done already, it is still worth doing asap.
      8. Pear Blister Mite

        Pear Leaf Mite

        If you do it right now, you can still spray lime sulphur on your pear trees for pear leaf blister mite, which cannot be reached by dormant sprays in winter. Also useful for peach leaf curl.

*** Please note, only do the lime sulphur treatment if you had problems with these diseases last year. There is no benefit at all treating trees that have not been infected.

*** Stay tuned, we’ll write again in early February with an update on what to do while the trees are dormant.


Rose Pruning 3

Winter Pruning of Climbing Roses

Winter is the best time to prune modern repeat climbers as all the old leaves need to be picked off anyway, so may as well prune at the same time. (Once blooming old roses and ramblers are best when pruned in the summer after flowering)

The key to climbers is to train the canes as near to horizontal as possible. A good structure of horizontal branches dramatically increases the number of flowers. Climbers that are allowed to grow straight up will have flowers only on the tips of the canes. Newly planted climbers won’t need much pruning the first year or two. Just tie in any canes that have developed over the summer and cut side shoots back to about 6 inches.

The rose in this picture would have most of its flowers at the top.

The rose in this picture would have most of its flowers at the top.

To prune an established wall trained climber, start by taking a critical look at the plant’s structure.   Identify two or three of the oldest, less productive canes for removal or cutting back. Decide which of the newly developed canes you want to keep and where they would be best tied in. Look for dead wood, weak thin growth and awkward branches.   Try to make a plan before you start cutting.

Once you have your game plan, start by cutting away what you don’t want. The oldest branches can be cut at ground level, or at a low point where you want a new branch to form. Keep an eye on where the buds are and make the cuts just above buds that are pointing in the direction you want new growth to go in.

Cut out thin weak growth, dead wood and awkward crossing branches. Leave the side branches on the remaining canes for the time being.   Tie remaining canes onto the supports, spacing them evenly to get good coverage. Now prune the side branches, or laterals, growing out of these canes down to 3 or 4 buds. Cut just above an outward facing one.

Rose Pruning 3Remove any remaining leaves, an important step in disease control.   Lastly, rake up any fallen leaves off the ground, lightly fork over the soil around the base of the plant, apply a couple of inches of compost and you’re done.

The steps for pruning a rose trained over an arbour or similar structure are pretty much the same. Try to train some of the branches in “S” curves up trellised sides or wrap them around the support posts. Be sure that the branches over the top of the structure are tied down securely to prevent wind damage and to promote good flowering. Cut back side branches to two or three buds.

Red rose 2

See how this Don Juan Rose is tied to the top of the arbour, producing many side branches and lots of flowers.

kale mulched for winter scaled

Protecting Your Winter Vegetable Garden

Most of the vegetables suitable for the winter garden are perfectly hardy, but minor protective measures will ensure a greater harvest, better quality leaves, and cleaner produce.  I’ve grown kale, leeks, chard and purple sprouting broccoli in a raised bed with no protection over the winter other than leaves covering the soil.

The soil needs more protection than the plants, ironically.  If we have a mild, wet winter, constant rain will leech nutrients away, compact the soil, and enable weeds to take hold.  If we have a cold winter with freezing and thawing, the soil needs an insulating buffer, because if it freezes, water can’t be absorbed by the plants, and the freeze/thaw cycle causes heaving of the soil with subsequent damage to the fine root hairs.

Kale mulched for winter

The best soil mulch is a 4-6” layer of autumn leaves, which insulates, protects and feeds the soil as it’s broken down first by worms, and later by microbes.  The breaking down process takes place faster if the leaves are chopped up first, but even if left whole, they will work.  In really cold weather, a further mulch of fluffy conifer branches or larger leaves may be used to cover the plants entirely. The shoulders of root veggies will benefit from a covering when the temperature plummets.

Covering with a plastic sheet is very effective in cold and rain; it raises the temperature while also protecting from drying winds. A covering such as this needn’t be attached to a frame, it can just be draped over the bed and held down with rocks.  Some people make a support with pipe hoops, or a tunnel of wire mesh which keeps the plastic from weighing down the plants if rain or snow accumulates on top.   On warmer days, you can leave the plastic sheet on to trap the warmth, or remove it for ventilation.

What about a greenhouse? This of course is the ultimate protection, and crops grown in an unheated greenhouse will have unblemished leaves, no slug damage, and the warmth of sunny days brings on spurts of growth unseen outside. Just remember to water occasionally, and in a very cold snap, a blanket or tarp will keep the plants warmer.  On sunny days you may have to open the doors to moderate the wide swings of temperature from day to night, and to provide ventilation.

What about slugs? Slugs don’t go south for winter, but continue to share our harvests, unfortunately. Safers Slug bait is safe for pets and other animals, and is worth using sparingly all season long in a mild winter.

Climbing cutworms can do serious damage in the early spring; their presence looks like slug attacks, but there will be no slime trail. They come out at night to eat, so either go out with a flashlight, or check for the characteristic C-shaped, ugly-looking caterpillar curled up in the leaf litter. Their pupae look like mahogany bullets, something to eliminate whenever you see them.

So enjoy your winter garden, and with these few precautions your harvest will be bountiful and rich.

At the risk of sounding like a broken record, I will remind you all of Linda Gilkeson’s fine book Year Round Harvest: Winter Gardening on the Coast, available via her website.


berberis

Winter Jewels

Brilliant bark, deceptively delicate flowers and the jewel tones of berries and persistent fruits that pop against winter’s muted greys and browns; there is nothing quite like a flash of bright colour on an otherwise dreary day to gladden the heart and to entice us outdoors for a closer look.  Just because its winter doesn’t mean the landscape has to be dull and boring.  A veritable kaleidoscope of colour is possible with a little planning.   Maybe there’s room for some of these beauties…

Best Fruits and Berries:  Berberis, skimmia, callicarpa, snowberry, cotoneaster, pyracantha, hawthorn, crabapple, aronia

Best Bark: Shrubby dogwoods, paperbark maple, heritage birch

Best Blooms:  Hellebores, witch hazel, skimmia, mahonia, viburnum tinus, cyclamen coum, winter aconite