Mason bee

Have You Heard the Buzz? Let’s Help the Bees!

Bee on flowerMost of us know already that there is a world-wide honey bee crisis; the bees are dying and our crops are threatened due to lack of pollination. This is a wake up call to which we can respond by helping our local bee populations.
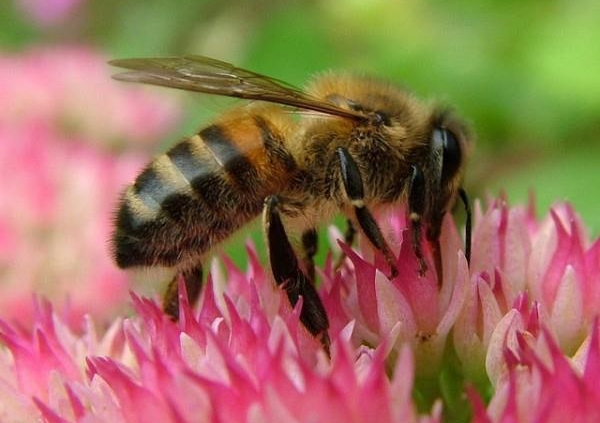
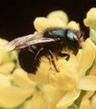
In part, a solution for pollination may lie with our own native species the orchard bee, or Mason bee. The Mason bee is only one of the many species of solitary bees, and is especially effective in pollinating fruit trees. A docile, friendly little fellow (or lady), the Mason bee rarely stings, but works tirelessly helping Mother Nature.
By making bees welcome in your garden with appropriate plantings, habitat, even housing, you will increase the production and ripening of your fruit and veggies, and aid in the setting of seed for your flowers as well.
As some solitary bees including the male Mason bees emerge early, spring flowers are a crucial source of sustenance for them. Come and ask us about plants that will attract this important member of your gardening team.

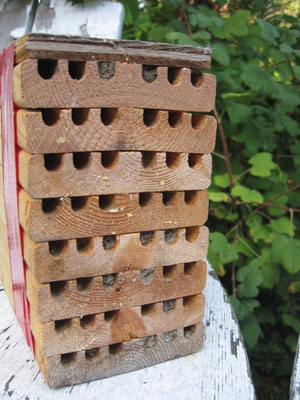
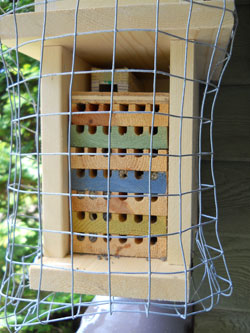
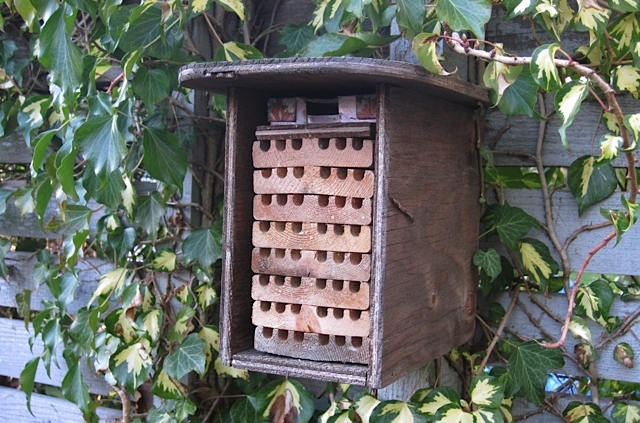
MASON BEES / BLUE ORCHARD BEES and CONDOS
Uncleaned-Cocoons-in-tray1
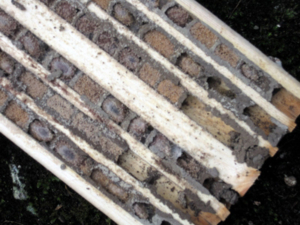
In October, bring in the cocoons, still in their rows into a garden shed or garage, the outer shell of the house can stay outside. Put them inside a metal or plastic container just to keep rodents away, until the winter cleaning, which can be any time from November to February. Cleaning the bees removes mites and mold which can be harmful to the cocoons.
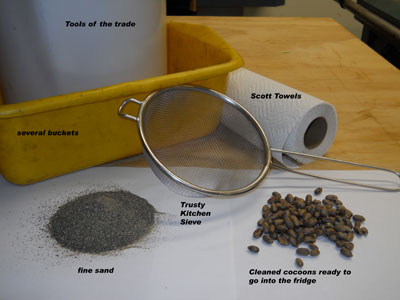
This job can be done right up to the beginning of February but when done earlier ensures more viable cocoons. We take the condos apart and carefully scrape the bees out of their rows (we use a small screw driver). Cells full of pinky/yellow bits but no cocoons contain pollen mites (Chaetodactylus krombeini) so leave them in the row and destroy them when you clean the wood.

To clean the bees use several tubs of cool, but not cold, water. Recycled plastic lettuce containers are perfect for this job. The bees are placed in the first tub of water and swished around gently to get the worst of the dirt off. Transfer them to the next tub of clean water and then to a third. After the third rinse, drain the bees in a colander and place them on cookie sheets covered with white paper towel. If many pollen mites (pinky coloured dots) are visible on the paper towel more washing is necessary.

Mason-Bees-On-Tray
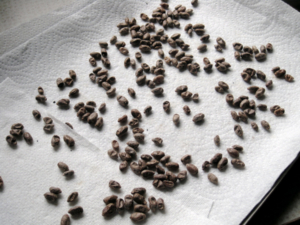
Return the cocoons to the paper towels. Bee cocoons are then left to dry in a protected, cool, airy location. Dry cocoons should be protected from mice and other predators before nightfall. For storage place the cocoons in cardboard boxes like shoe boxes and place them in wood or plastic containers. Do not place the cocoons directly into plastic as it is colder and the humidity is different. Keep the containers in a cool, frost free location for the winter.

To clean the condos scrape out large bits with the screw driver. Use a stiff brush to clean the balance of debris and wash them well. Leave the condos in a very warm, dry location to destroy any mites that may have survived. Alternatively, the wood can be placed in a warm oven – about 150 degrees F, for 45 minutes.

RELEASING YOUR MASON BEES
In mid to late March with the hope that spring has arrived, and the promise of all that luscious fruit from your trees and bushes, it’s time to think about releasing your mason bees from their refrigerated snooze.

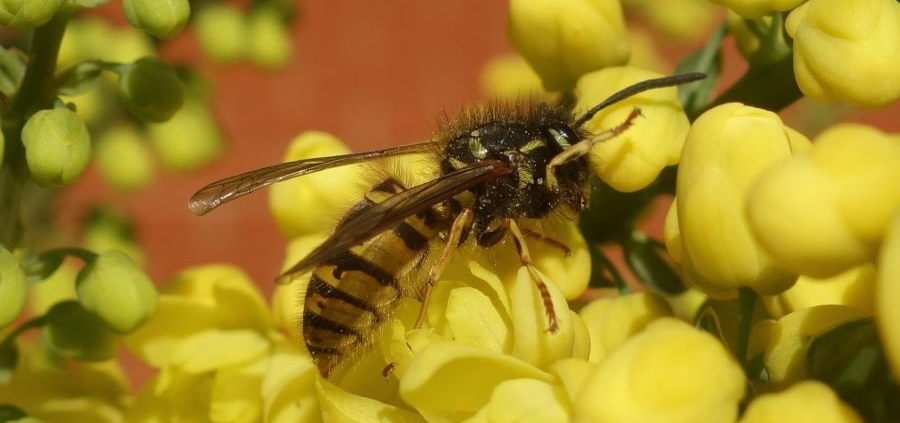
The male bees emerge about two weeks before the females, when it’s reliably 14 degrees C. They will need a source of pollen to survive while they wait for the females. One of the best food sources is Pieris and when it is in full bloom it is a good indicator that it’s time to start putting the bees out. Many other early-flowering perennials, shrubs and trees will also provide food. Native bulbs, Forsythia, Pulmonaria, Ribes (flowering currant), Mahonia aquifolium and Erica (heathers), attract not only the mason bees but the big clumsy bumble bees as well. See below for a full list. Clumsy is good in the bee world, as a big floppy pollinator spreads even more pollen around!

As soon as the females emerge, they mate with the waiting males and then the real frenzy of pollination takes place, with each female making about 1500 trips to your fruit blossoms for each egg she lays. An incredible amount of work, and sadly she will die after three weeks of this exhausting labour.

If you do have an orchard with trees that blossom at different times and lots of mason bee cocoons, put out a batch now and follow up with more, timing subsequent releases to coincide with the swelling of the buds on the fruit trees.

If you have purchased bees, they will likely be in a pack of 25, with a few more males than females and will be enough to fill one bee house. If you have bees sleeping peacefully in your fridge and are planning to release them in stages, then you will need to divide them by gender, to ensure a good mix of males and females. If you have lots of bees and want to encourage them to stick around, you’ll need more than one house.

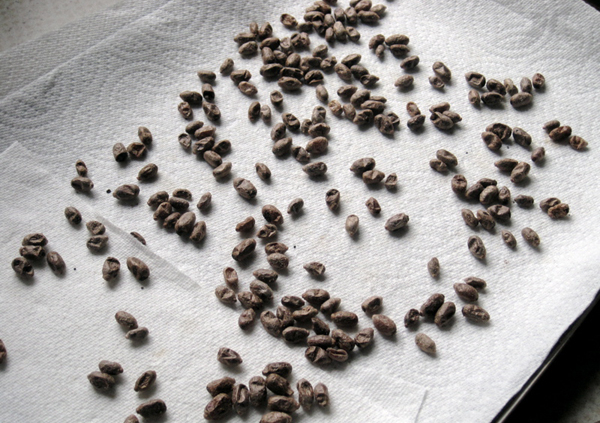
OK, so how do you tell a male from a female mason bee? No, there will be no microscopic viewing needed. The females are in the big bodacious cocoons, about the size of a good plump raisin, the males are the puny ones, more like a currant. Hmmmm, what about all those middle sized ones? Not too sure about them? They are known as indeterminates and could be either male or female. I generally put 10 females, 12 males, and 3-5 indeterminates in a group, which is sufficient for one bee house.

The females want to lay their eggs near where they are released, so to encourage them to use your bee house, put the release box right near the house. I put the cocoons in a small cardboard box, such as you’d get jewellery in, with a hole for the bees to crawl out of. I tuck it right into the bee house, in the vacant area above the nesting trays, pushing it back a bit so there is a bit of a platform for the groggy bee to sit and recover before flying off. Another good option is to tape two of those shallow styrofoam meat trays together, face to face, and make a hole for escape. The hole should be around the size of a pencil, or about 5/16th of an inch. You can also place the cocoons directly into the trays, with the larger females in back and the smaller male cocoons in the front of the rows.

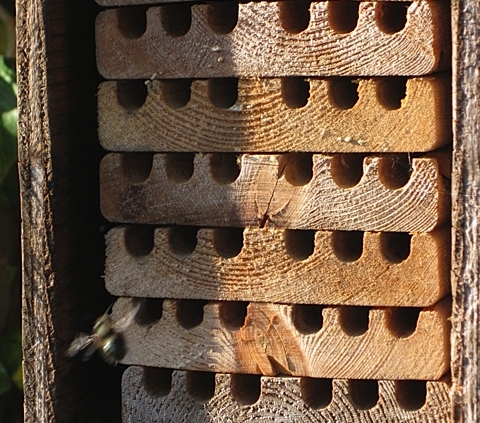
The bees will do the rest. When the temperature is reliably around 14 degrees C, you will notice males flitting around the garden, and a couple of weeks later you’ll start noticing the holes in the house filling up with mortar, which the females use to block access to their developing brood.

Bee on Mahonia

Plants to Nourish and Encourage Native Bees

by Faye
To keep your local bee population well fed and happy, think ahead to have early blooming flowers in your garden. Bumble bees emerge from their winter nests while the weather is still cold, and need sustenance right away. The Masons are a little later, when the temperature is reliably above 14 degrees C. If there are no nectar flowers to welcome them, they will not survive.

BUMBLE BEES
Prefer pink and purple.
They hatch in mid February, so what is available?

  • early Rhodos
  • winter flowering Heathers
  • Sarcococca
  • Forsythia
  • Winter Jasmine

MASON BEES
Males hatch about 2 weeks before females, and wait around until females emerge. If there is no food, they either die or fly away and seek food elsewhere. Mid March is usually when the males emerge.
Best plants to have for these early bees are:

  • Pieris (main food source for Masons)
  • Ribes sanguineum
  • Erythronium, Camas, Trillium, other native bulbs
  • all flowering natives
  • Oemleria cerasiformis (Indian plum)
  • Pulmonaria

Ideally, we should arrange to have other flowering plants around to feed the bees BEFORE the fruit trees are ready for pollination. Once the fruit trees are in bloom, probably April, we hope the bees will head to the trees instead of other earlier plants.

NATIVE BEES IN GENERAL
There are thousands of species of native bees, probably many hundreds in Victoria alone. Some are specialists (eg only attracted to squash, Aconitum, etc etc), and some are generalists, happy with any flower that passes by.
Generally the younger bees prefer the flat and easily accessible flowers, eg daisies, while some wiser and older ones know how to access even the most convoluted petal arrangement. The bees that like Aconitum for example, tend to be older bees and since only they can figure out the access to this flower, they will go from one Aconitum to the next, achieving cross pollination among all the flowers in the patch. Preferably, plant blocks of the same species of plant, not just an isolated specimen.
It’s extremely important to have a variety of flowering plants, especially natives if possible, throughout the growing season (early flowering to late flowering) to appeal to the widest variety of native bees. While some hybrids have been so carefully selected for colour, size, fragrance etc, many are practically sterile in the pollen-producing department. Native bees find native plants 4 times more attractive than the exotics.
Some good sources of pollen and/or nectar for native bees throughout the seasons: (Pollen supplies the protein and fats, while nectar provides sugars for energy. Those bees work hard!)

  1. Queen Anne’s Lace
  2. Ceanothus
  3. Sedum ‘Autumn Joy’
  4. Rubus Spectabilis (Salmon berry)
  5. Smilacina Stellata (Star Flowered Solomon’s Seal)
  6. Pussy Willow
  7. Sambucus
  8. Solidago
  9. Vaccinium
  10. Mahonia
  11. Penstemon
  12. Amalanchier
  13. Salix
  14. Symphoricarpos
  15. Achillea
  16. Rudbeckia
  17. Coreopsis
  18. Origanum
  19. Echinops
  20. Rosemary
  21. Digitalis – this one is very interesting – male flowers are higher up, less mature (!) than the females which are lower down. Bees always start at the bottom of the flower, work their way up. So they get they get the male pollen on their bodies at the top of one plant, then go to the next one and deposit it on the female flowers of the next plant, thereby fertilizing to set seed. Another good reason to plant flowers in blocks, the bees prefer it.
Bee in bed

Early To Bed For My Bees This Year

While it’s still only November, I decided to put my Mason Bees to bed early.  I hoped that maybe my precious pollinators would have fewer mites if I got them cleaned earlier in the season. Any time between October and January is prime time for cleaning cocoons, and I’ve usually done this task in January.Our cold and damp springs of late have caused the local mite population to proliferate, and in damp neighborhoods such as mine, they positively thrive. They literally hitch a ride on the backs of the female bee as she carries her cargo of pollen into the bee house to sustain her young. Sadly, the mites are there in the chamber as she seals it; sealing the fate of her egg as well.

Each year I’m astonished to see yet more mites in residence. This year there were several cells with nothing but mites, obviously they consumed the egg before it could even develop. In spite of the mite infestation, the number of mature cocoons is greater than last year; the warm summer enabled the bees to stay alive long enough to make literally thousands of trips from blossoms to bee house, again and again, laying eggs for another generation of Mason Bees.

 Cleaning the cocoons is now easier with Brian’s method of using sand to scrub them clean.

I actually went through the whole process twice this year, to make sure they were thoroughly clean.  Scrubbing them in the slurry more than a few times, I then rinsed them several times, and when they were dry on the paper towels, inspected it very carefully for any sign of debris. Once nice and dry in the cold garage, they will go into the fridge for winter hibernation, wrapped in paper towels then into a zip loc bag.

Over the past several years we have posted several articles on our website, detailing our own journey to making our gardens more welcoming to these friendly garden helpers, and providing tips on how to keep them healthy.  For more information, see the section marked Mason Bees.

Isn’t it fun to think of the thousands of bees all of us have nurtured, and the delicious fruit they have provided?

tools of the trade copy

A Quicker Way To Clean Mason Bee Cocoons

by Brian

Have you opened and cleaned your mason bee condos yet?  If not, you should be planning to do this soon, and then get the cocoons into the fridge, in a ziplock bag, to delay emergence until the timing is right for pollination.  I opened and cleaned my condos a few days ago and I tried a different method for cleaning the cocoons, using fine sand to scour them, a bit like using Vim on your countertops.

Using sand worked a lot faster and resulted in much cleaner cocoons than the “multiple rinse” system, and I’ll be using it from now on.   I have a garbage can of coarse builder’s sand that I use on my driveway when it’s icy, and I made use of that, but sifted it first (with one of those handy kitchen sieves) so that in a small bucket I ended up with a few cups of fine sand.  The photo shows everything you need for this project.

Tools of the Trade

After the cocoons are scraped out of the channels into a bucket, add enough water to moisten everything, let it soak for 5 minutes and then scoop out perhaps 40 or 50 cocoons at a time with your trusty sieve and quickly rinse away most if the dirt, leftover pollen, mites or mite eggs (lots this year because of the wet Spring) and mite feces (the yellow stuff in compartments that don’t have a cocoon in them).

Cleaning With Sand

With the cocoons still in the sieve, and working above a bucket, sprinkle enough sand onto the moist cocoons until they are thoroughly covered in a sandy paste. Then swirl and swish this mixture around for a minute or two. The polishing action of the sand quickly removes any remaining detritus and a quick rinse shows very clean cocoons.  I repeated the process one more time, rinsed thoroughly, and then placed them on Scott towels to dry.  Clean cocoons leave almost no trace of yellow on the paper and I was able to achieve, with two quick sand washes, what used to take four or five long soakings and rinses.  Be sure to let the cocoons dry thoroughly, in a cool place, and then get them into the fridge.  I put mine in a small paper bag and then inside a sealed ziplock bag.

A word of caution about this system: sand is a great blocker of drains, so I worked and rinsed entirely into buckets and tossed the residue outside, and so should you. Lastly, go quickly now into the kitchen and replace your (spotlessly clean) sieve before anyone notices what you’ve been up to.

veggies in winter

Mason Bees And Veggies In January

With our gardens under a beautiful white blanket at the moment, it’s a pleasure to think ahead of warmer months outside.  While the nursery is now closed until February, we have been busy planning, ordering, and generally looking forward to a wonderful new season ahead.

Veggies In Winter

Are you poring over seed catalogues? That always feels to me like the first step in the wonderful cycle of life that is gardening, and one of the best parts of winter.  With seeds coming in to the nursery in early February, it’s not too early to be drawing up plans for what you want to grow, and where to plant, being careful to rotate crops when you can.

Are you enjoying winter harvests?  The leeks that we just finished were plant starts in April, and the delicious kale and chard that we are eating now were mere seeds in August.  Here they are now in the great Canadian refrigerator!

Purple Sprouting Broccoli

This is my first time growing Purple Sprouting Broccoli, but I’m expecting a bountiful crop of nutritious, crunchy side shoots that will keep on giving……and giving…….and apparently giving until we’ve had more than our fill!

Even under the snow, the plants are impressive.

Have you washed your Mason Bee cocoons?  This morning, mid-January, I washed my cocoons. Previous article.

While my earlier blogs describe the method I use, Brian has a New and Improved Method, which he’ll be writing about in a coming post. As long as you get the cocoons washed, dried and put into plastic bags in the fridge before the weather warms up, you’ll be fine.

I have some good news and some bad news on the bee front.  The good news is that my bees were very active last year in spite of the poor spring.  The condo obviously had been filled very well, but as you can see in the pictures, whole chambers were plundered and the cocoons themselves eaten.  I discovered THREE wasps, fat and still sleepy but alive, sheltered inside, where there had once been happily maturing mason bees.

Plundered Bee Condo

The chambers with only yellow dots are filled with mites, which devoured the cocoons.

It’s a cruel world out there if you are a Mason Bee, all the more reason why we must encourage these little creatures who do so much for us. Their life cycle is entwined with our own; let’s help them thrive as we embark on another year in our own journey with the garden.

We all wish you Happy Growing for another year and may 2012 bring you the best of health and happiness.

fayes bee condo

Putting Your Bees To Bed

We are now past the Autumnal Equinox, and into the third season of our year.  It’s been quite a year, with bees struggling against unseasonable cold and wet for a very long time this past spring. However, the cycle of nature worked through the challenges, and the bees are now fully formed in their cocoons, all settled down for a long winter’s nap.

I didn’t have the success I’ve had in the past, as you can see in the photo there are many apartments still for rent in my bee condo.  Fortunately, Brian has a full house, with most of his compartments mudded over, so we should have lots of bees available early next spring.

Around this time of year is a good time to put the cocoons, still in the condo, inside a shed, garage, or anywhere outside where it will be somewhat protected from the winter storms and predators, yet still cold enough to keep the bees in hibernation. Now that the bees are fully formed, there is no danger of moving them so just take the inside trays out of the condo (if using our condos or any kind that has a removable stack of trays) and put into a secure box where rodents can’t access for a mid winter snack, and keep the box in the shed. It should be noted that some bee nurturers choose to leave the condo outside, but if yours is situated where blowing rain and snow pose a hazard, then it’s worth the bit of effort to move to a protected place.  No need to clean them yet, that can anytime between November-January.

Click on the Mason Bees Category  for our other bee articles and useful info.

As the winter cold and storms descend upon us, you’ll feel happy knowing that your precious little pollinators are snug in their beds, ready to continue their marvelous cycle of life next spring.

mason bee hourse prote

Mason Bee…Near Tragedy

Damage to mason bee channels by pesky woodpecker

At the end of the day a few weeks ago I went onto my porch to check on my bees and discovered to my horror that a woodpecker had visited my bee condos.  As the photo shows, almost all of the mudded-up channels had been opened.  There were shards of clay lying all over the place and I was depressed at what appeared to be a serious blow to this year’s effort at bee husbandry.

However, it was not as bad as it seemed at first.  The mason bee is a clever little creature, and it seems the females leave an empty space behind the last bit of mud in a channel before the larvae compartments start, so even a bird with a long beak can only get in as far as the first one or two larvae. I definitely lost some larvae, but what is more of a concern is that the bird might eat some of the adult bees and indeed this seems to have been the case.  Mason bees are only out of the condo during the warmest parts of the day, usually late morning to late afternoon, in my garden.  If the bird arrived when they were still home, then the adults can be picked out of the channels quite easily, and a headcount later that evening confirmed this.  I have been keeping track of the number of active females and prior to the rampage, there were 23 and that dropped the next day to about 15.

I have been able to find a quick and effective fix for this problem, and if you see Northern Flickers or any other type of Woodpecker, large or small, in your garden you might want to do the same.  I used tin snips to cut a rectangular piece of wire mesh with one-inch squares to fashion a sort of cage around the condos, and screwed in into place with a few screws and washers to hold the wire tight.  Be sure to leave a space of at least four inches from the wire to the entry holes.  

It looks a little like the condo is wearing an old goalie’s mask, but it has worked perfectly: the bees navigate their way through the wire with little trouble, and my wife, Michele, has since seen Woodpeckers trying unsuccessfully to get at the larvae.  They can’t and they soon fly away, perhaps to visit YOUR unprotected bee condos.  Almost all the channels that were opened have been used again by the bees and are tightly shut.  At last count I have 31 channels completely sealed and many others partly so.

Please feel free to let me know on this blog site how this has worked for you, or if you have similar experiences or a good system for protecting your condos.

Good Luck with your bees!

masonbeeflyingintohouse

The Mason Bees Are Awake

Finally finally, the weather seems to have warmed up, and the cocoons in the bee houses are coming to life. The emerging bees will chew a little hole, and crawl out groggily, sit for a moment, then immediately fly off in search of that precious nectar and pollen which awaits within the flowers nearby.

My garden has been a vision of spring bloom lately, so I’ve been anxiously watching to see some kind of activity around the little house, not wanting all this floral abundance to go to waste, at least as far as the mason bees are concerned.

It might be hard to spot the males, but once you see bees going in and out of the little holes, then it’s clearly the females setting up their nurseries.

Mason bee flying back to house

I am not a photographer by any stretch of the imagination and am not equipped with fancy lenses that can capture the magic of in-flight insects, but after taking several shots around 6pm yesterday, I did capture this one lone female, wings outstretched, heading back in with some pollen to start her brood.  There were so many bees coming and going, I could hear the buzz before seeing the action, yet capturing even one picture was a challenge.
The one thing that is needed now is a source of mud for the females to build the cement wall between cells. Get it? Mason bees, making cement.

This is way more mud than they’ll ever need, but it’s always fun to remove clay from the garden.

They prefer clay for their masonry, not regular mud, if possible. I just dug down a little way in the garden soil, and found a good supply of clay, and put it in an old bird bath with some water, but even if there is just any spot in your garden with good moist mud, they’ll figure it out as they always have.

Do let me know the progress of your bee house; are you seeing any cells fill up? This is the fun part.  Once they start, it’s imperative that the house not be moved at all, or the egg can be knocked off the wad of pollen. Leave the house where it is, and let Mother Nature take care of the rest. By September, the cocoons will have fully formed bees in them, and the cycle continues.  Isn’t nature wonderful?

masonbeehouse

Waking Up The Mason Bees

Cleaned trays put back in the house.

With the hope that spring has arrived, and the promise of all that luscious fruit from your trees and bushes, it’s time to think about releasing your mason bees from their refrigerated snooze.  Check out our webpage for more details on Mason Bee Releasing.

If you do have an orchard with trees that blossom at different times and lots of mason bee cocoons, put out a batch now and follow up with the rest later, timing subsequent releases to coincide with the swelling of the buds on the fruit trees.

My release box is just a little cardboard box that jewellery came in, with a hole cut for the bees to crawl out. You can actually see some of the cocoons inside. When I place it inside the bee house, I recess it a bit, so there is a platform for the bees to rest before flying off. Some people actually put the cocoons back inside the bee house, making sure to put the female cocoons towards the back, as the males crawl out first. Any small container is fine. Don’t make the holes too big, or predators could get in.
It could be placed beside the house, on top of the house, etc, but I find the little extra space on top of the bee trays to be perfectly safe, and the bees seem to like it too.

Mason Bees On Tray

Winter Care of Mason Bees

Diary of a Bee Nurturer
Last year at this time, I posted Diary of a Novice Bee Nurturer on our website, and now, having completed two full years with my Mason Bees, I’m tentatively deleting the word  “Novice”.  My bees and I have come a long way together.

In October, I brought the cocoons, still in their rows within the bee condo, into my garden shed. The outer shell of the house is nailed to the fence, so it remained outside, but to protect the cocoons from extreme weather I usually bring the innards of the condo into the shed; this could also be a cold garage, carport, etc. I put it inside a metal or plastic container just to keep rodents away, until the winter cleaning, which can be any time from November to February.

plundered bee condo

plundered bee condo

I have recently finished the winter cleaning of the cocoons, and was quite shocked to find such a quantity of yellow crud, mites, mould, and general detritus in my bee condo. Apparently, this is a rather bad case, for some reason I have a plethora of mites. Did I not clean them adequately last year? I did all the rinsing that was advised, but if I did leave mites on the cocoons, they would hitch a ride on the emerging bees and follow them back into the condo, and feast on the little mound of pollen which is meant to nourish the eggs.

This year I’ve been especially careful, and have learned that after the washing process, I can further protect them simply by changing the white paper towel upon which I put the cocoons to dry. I even changed the paper again after I had put them into the box for cold storage, and was surprised to see the telltale tiny black dots indicating mites.

Many of you may not have to fuss as I did; I live in a very natural forest-type area, and perhaps the humidity, leaf mould, and buggy environment increase my mite population?

My proud moment was when they were all cleaned, dried overnight in the cool garage then placed in my refrigerator in a paper box, then inside a plastic container where they’ll reside until it’s time to move outside to the release box near the bee condo when it’s reliably 14°C.

Cleaned Mason Bee Cocoons On Tray

Last year I had an intermediate step, instead of the fridge they were kept in my garden shed, where I anticipated further cold weather.  A little burst of spring caught me off guard, and to my chagrin, I found the bees hatching in the shed, crawling on my tools and clinging to the broom, desperately searching for pollen. While they must have been somewhat confused, they seemed happy as I carefully carried them outside to the waiting blossoms of the Mahonia and Pieris. As I said, my bees and I have come a long way. Being part of the life cycle of the Mason Bee once again, I feel as if I’m helping Mother Nature in her mission of feeding us, her own developing offspring.