Bare root roses 2

Planting Guide for Bare Root Roses

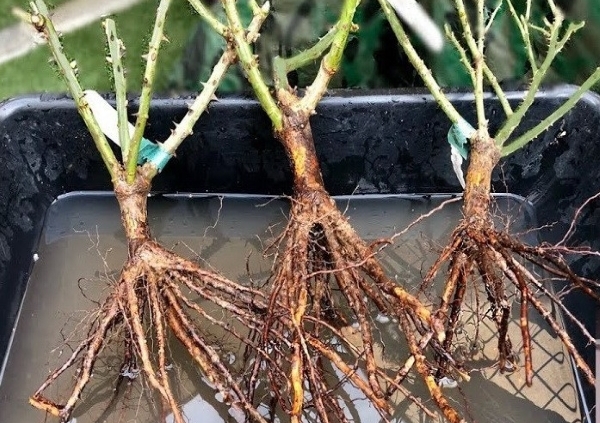
Bare root roses are an excellent way to establish a new rose in your garden. Follow these 5 easy steps to ensure your rose gets off to a great start.

Before Planting – If you cannot plant right away, keep the roots covered in soil or mulch and keep watered to ensure they don’t dry out.

Step 1 – Remove the elastic bands

The roots are wrapped in elastic bands for transport, these need to be removed before planting!

Step 2 – Rehydrate the rose

Submerge the rose roots in a bucket of water for at least 30 minutes to allow the rose to rehydrate before planting.

Step 3 – Prepare the hole

Dig a large hole, approximately 2’ wide by 2’ deep. Make sure to loosen soil up at the bottom of the hole. If existing soil is poor quality, make sure to add a good quality garden soil when planting. This is also the time to add bone meal and rose fertilizer to ensure strong growth in the first season. If adding rose fertilizer sprinkle in the bottom of the hole and add soil on top to prevent the roots from coming in direct contact with the fertilizer.

 Step 4 – Planting the rose
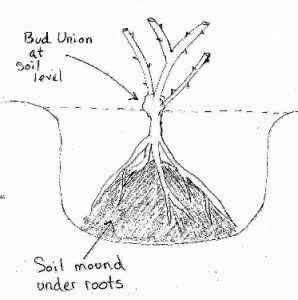
Planting depth bare root rose

Fig 1. Planting depth for bare root roses in the Pacific Northwest.

Mound soil in the centre of the hole so that the roots lay on top of the mound of soil. This will help to prevent any air pockets from forming.

If adding new soil, make sure to mix it in with the existing soil so that the change in soil type is gradual for the plant as it grows.

Plant the rose so that the bud union is at, or just slightly below, ground level. The bud union is the swollen area where the stems arise from the root stock.

Fill in hole with soil about half way making sure there are no air pockets and water thoroughly. Once water has drained fill in the rest of the hole with soil and water generously.

 Step 5 – After Care

Make sure to keep the rose well watered, especially in the first year. Roses are heavy feeders and will benefit from regular fertilizing.
Tree flare diagram

Ten Tips For Successful Planting


The principle of ‘Do it once, do it right’ definitely applies to planting. Get new plants off to a good start by paying attention to the basics. You will be glad you did.

1. Plants Grow!  The most common planting mistake is not allowing enough space between plants. Read plant tags carefully to determine appropriate site and spacing.  

2. Soak plants well while still in their nursery pots.  Soak in a bucket or dribble with the hose.
3.Dig the planting hole the same depth as, and 2 to 3 times wider than the root ball.  Fill with water and let it drain away – more than once if it’s dry.
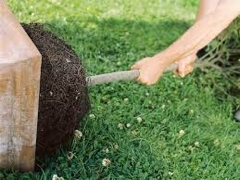
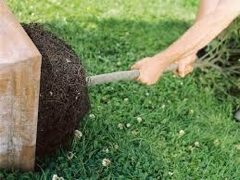
4. Tease and spread roots gently outward. Entwined roots need loosening – slice vertically and splay.  If the roots are a solid mass, slice an inch or so right off the bottom. Don’t skip this step!
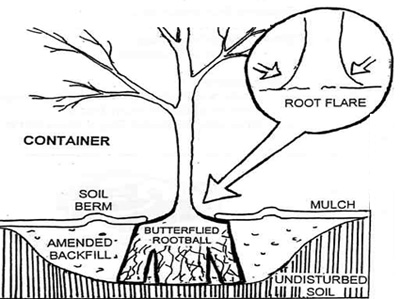
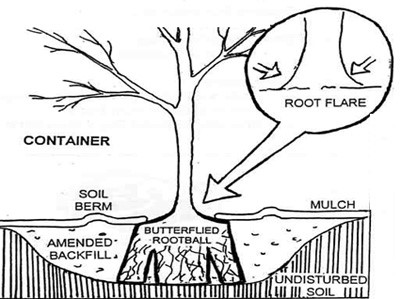
5. Find the root flare and place plants in the hole, make sure that the root flare is at grade.  Do not plant too deeply – the root flare should be at the soil surface.
6. Half fill the hole around the plant with native soil.  Add a handful of bone meal and no more than 25% of amendments like compost.   Exception is heavy clay – mix in one third gritty compost and/or bark mulch. Water the partly filled hole to settle the soil, then top up with the rest of the soil. 
7. Tamp down soil around plant, gently but firmly.
8. Mulch around plant with compost or bark mulch .  Avoid getting mulch close to woody stems or crown of plant.
9. Stake trees with a sturdy stake on either side of the root ball.
10. Water slowly and deeply.

Always water at planting time, even if the soil is wet and it’s raining. Watering settles the soil around the roots and eliminates air pockets.

Summer is the time to check your irrigation
It’s easier to see problems in the summer and fall, when shrubs are in leaf and perennials are full grown, than in spring when branches are bare and plants are dormant. Look for sprinklers that are blocked or areas that are being missed and either repair or make a list for spring.
Winter is the time to check your drainage
It’s hard to relate to poor drainage at this time of year, so make a point of touring the garden when it’s really wet, and looking for squishy spots. Make note of areas that need to be remediated or replanted with water tolerant plants.
Repotting 1

Repotting Large Containers

By Susan

Occasionally Japanese maples, roses, bamboo (especially bamboo!) and other large container plants need to be re-potted. How can you tell if it’s time? If you feel that a particular plant didn’t do so well last year, or that water ran right through the pot without being absorbed, then it probably is. Repotting doesn’t always mean going to a bigger pot. It could just be a case of trimming the roots and replanting into the same pot using fresh soil.

Handling big pots is easier than it looks if you know a few tricks and have someone to help. A day or two ahead of time check the moisture in the containers. It’s easiest to do if the soil is damp right through, but not soggy.

Before you start, you will need some fresh soil. We regularly recommend one of three options:

  1. The easiest is premixed potting soil that has a soil base – avoid light weight peat- based mixes. (We like Growell Sterilized Potting Soil).
  2. Alternatively, you can use a bagged soil like Grower’s Delight Garden Soil mixed 50/50 with bark.
  3. If you prefer to mix your own soi, a blend of equal parts finished compost, bark mulch and good garden soil is ideal.

N.B. Its best to always use sterilized soil for Japanese Maples, as garden soil can harbour harmful fungal spores.

Time to get started! Make clean-up easy by spreading out a tarp to work on.

Run a long, sharp knife, like a bread knife, around the sides of the pot. When it seems loosened, lay the pot on its side and carefully pull the plant out. This is easiest if the container has straight sides, but will take much more effort if the sides are curved inwards (a good thing to remember if you are buying new pots). You don’t have to be too gentle at this stage, especially if the plant is dormant. Plants are tougher than you think.
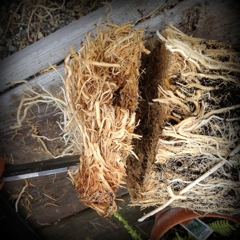
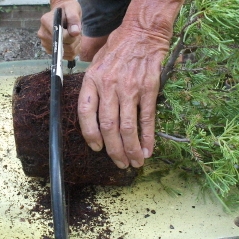
Tease the soil away from the roots with a small hand fork and trim long circling roots. If the root mass is solid, use an old knife, pruning saw or even a Saws All, to cut away a couple of inches from the sides and bottom.

Clean out the container and check that the drainage holes aren’t plugged. Cover them with some screening to keep them open. Mesh dry wall tape or old window screen work well.
Add fresh soil mix to the pot and reposition the plant so that the top of the root ball is at the same level it was before you started- not too deep or too high.
Fill in with the soil mix, to about two inches from the top. Tamp the soil down gently around the roots so there are no air pockets.

Return the pot to its permanent position. Top dress with a slow release fertilizer and water well. Lastly, prune for shape and to remove any damaged or inward growing branches.

If your containers are too big to move, scrape away what you can of the old soil and top up with some fresh soil mix instead. .


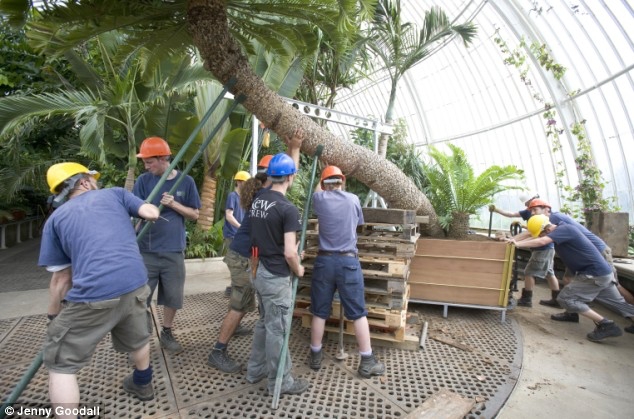
The oldest known potted tree

It’s possible to re-pot anything if you have enough help!

It took nine gardeners, a crane and three months of meticulous planning to place a one-tonne tree, believed to be the oldest potted plant in the world, into a new container.
The ancient cycad, a palm-like tree, was collected from South Africa on one of Captain Cook’s voyages and has been at Kew Gardens since 1775.
It has grown outwards and upwards at an inch a year and now reaches almost 15’. It grows at an angle and is propped up by stilts.

From The Daily Mail


comparison of tomatos

How Not to Kill your Seedlings

By Faye

Killing your seedlings is easy, but so is growing them to become strong and vibrant young plants!

Whether you sow your own seeds or buy starts from the nursery, your seedlings will go through a vulnerable stage of babyhood, when you must meet their every need. Some simple guidelines and lessons learned along the way:

*Use a sterilized soilless seed starting mix when sowing seeds.

* Seeds need heat, seedlings need light. A heat mat and grow lights will be the single most effective investment you can make if you really want to get into seeding. Once the seeds germinate, keep light about an inch above the seedlings, and only turned on for 12-16 hours a day.

* Don’t over crowd. Use scissors to snip off excess seedlings if they are too close to separate.

* Once they have 2 sets of true leaves, start to fertilize. Use a weak solution of liquid fish or seaweed.

* Always water from the bottom. Your seeds will have been sown into a tray or cell-packs with drainage. Put these into a non-draining tray, add water to bottom tray, removing excess water after half an hour or so. Watering the top of the soil encourages damping off, a fatal fungal disease of seedlings. Watering from below also encourages roots to grow downward seeking moisture.
If you want to be extra kind, water with room-temperature saved rainwater or de-chlorinate your tap water by leaving it sitting out for a day or so before using.

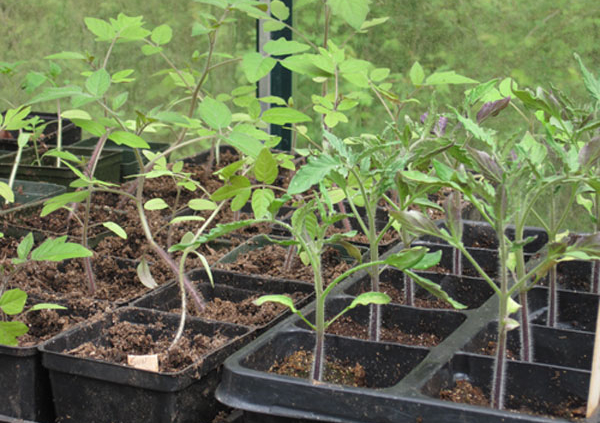
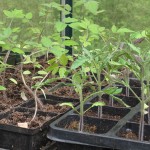
Tomato seedlings on right were moved out to greenhouse earlier than the ones on the left.

* Pot on! Don’t allow roots to become over crowded and tangled, move plants up to 4” pots. Hot-weather crops like tomatoes, eggplant and peppers will need to be started early yet moved to successively larger pots before planting out.

* Grasp by leaves only. Seedling stems are very fragile and easily damaged. If you need to separate seedlings that have been grown together in trays, tease roots apart gently with fork or fingers.

* Label everything! You think you will remember which flat is which, but you won’t. Trust me.

* Pinch back. When plants are 3-4” tall, with 2 or 3 sets of true leaves, nip out the top leaves to encourage branching, more flowers and fruit. Technical bit: plant hormone AUXIN is in terminal (end) bud, and causes vertical growth but suppresses side growth, so you want to interrupt this cycle. Don’t pinch back tomatoes!

* Rough ‘em up. Brush your hands gently over the tops of the little plants; this toughens up the cells and prepares them for the great outdoors.

* Harden off. Very important, the little plants need to be gradually acclimated to cold, wind, rain, sun. Direct sun can burn leaves if not properly hardened off.
Give them partial days in dappled shade, bring in for the night, gradually expose to more weather and more sun. A coldframe or cool greenhouse makes this transition easier, but be careful on sunny days.

* Leaving the nest. When it’s time to move the seedlings to the garden, be wary of critters; slugs love the tender young shoots. Safer’s Slug Bait is my best defense, along with rabbit fencing of course. Checking after dark sometimes uncovers cutworms too, be vigilant.

* Label everything! Did I mention this already? Knowing the variety and date you planted is helpful when planning next year’s crops. Many good growers maintain a notebook listing plants, date seeded, when planted out, and result.

* Enjoy the harvest!! You’ll be glad you got your babies off to a good start, and they will thank you with delicious produce.

Peas

PEAS TO PERFECTION

By Faye

Few garden crops rival the perfection of crisp peas in late spring. Getting them started early is the secret, as they prefer to grow in cooler temperatures.

Read in “Peas in Particular” to see a foolproof way to beat cold weather, critters, and rot.
Since writing that article a few years ago, I have become more sophisticated and now use well-draining trays for my damp vermiculite instead of milk cartons, on a heat mat with grow lights suspended from the ceiling; faster and easier, in limited space. I currently let them get to about 4” tall before planting outside, as the starch is used up from the seed, and the varmints aren’t so interested in this ‘food source’. I am careful to harden them off before moving them out to the cold.

Don’t have a heat mat and grow light? Peas aren’t fussy, they are fine at room temperature, but will be slower. Once germinated, they don’t need heat, so a cool greenhouse, sunroom or even outside in a spot protected from weather and predation is fine. At this stage bright light is paramount.

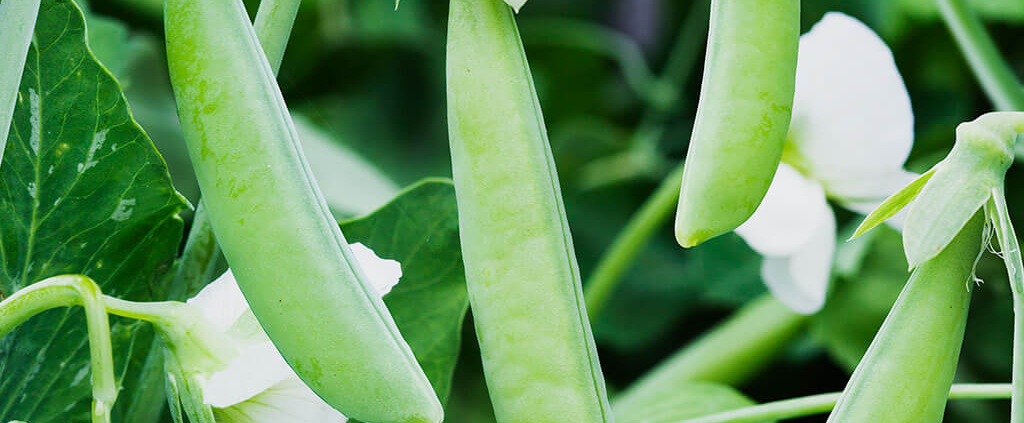
We are often asked “What is the difference between Snap peas and Snow peas?” It’s hard to remember which is the flat one and which is the one with peas in it? The way I remember is that snow lies flat on the ground, and Snow peas are the flat edible pods. Snap peas, aka Sugar Snap, have fully formed peas inside. Both kinds have edible pods, ‘mangetout’ or ‘eat it all’.

Dwarf Peas

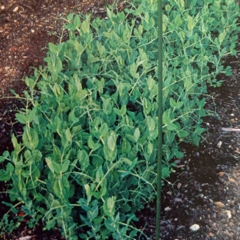
While I’ve always grown both Tall Telephone and Sugar Snap Pole (in the ground at home, and in large pots with bamboo poles at the nursery), another option is to grow dwarf peas, not needing a trellis. Allegedly they produce more peas per square foot, and would be ideal for smaller gardens, patios and balconies.
Plant them in a block, not in rows, so you can just reach down into the branches and harvest.

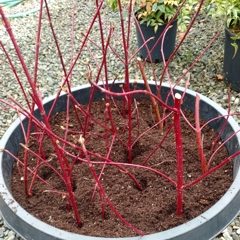
Cornus twigs for pea support

I’m trying Little Marvel at the nursery in a large pot, planted densely all over the soil, with pretty red Cornus twigs to give them something to climb on. Come and check out their progress!

Some of the many good varieties of dwarf peas are: Sugar Ann, Little Marvel, Sugar Lace II, Lincoln Homesteader, Dwarf Grey Sugar.

Whichever pea variety you love best, no one will ever have to remind you to “Eat your peas!”

mulching

Planting Trees and Shrubs

He that plants a tree loves others beside himself – Thomas Fuller

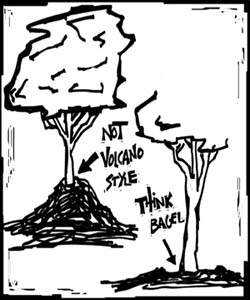
1.  Before Planting. Take a moment to consider something that could make a huge difference in the health of your plant. What kind of soil and drainage does the site have? Most failures of new plantings in coastal BC are due to waterlogged soils. If you have heavy, clay soil, one way to avoid problems is by raising the planting area. Planting in a beam or slightly raised mound is an excellent way to get the roots out oaf a wet area. If, when digging the planting hole, you run into clay, it is better to stop digging and instead make that the bottom of your planting hole. Mound soil up around the root ball, starting well away from the plant, to achieve the proper planting height.

shrub pixel size2.  The Planting Hole. Dig the hole the depth of the root ball, but at least twice its width. Loosen the soil around the hole with a shovel or spade fork. Most roots spread away from the plant in the top six inches and this is why it is important to dig a shallow, wide hole so that the roots can travel more easily.

3.  Planting Container Trees and Shrubs. Remove the plant from the container and set the root ball on its side. Handle carefully, especially if the plant is not well rooted. If root-bound, carefully loosen the root ball. If the roots circle the inside of the pot, use a sharp, clean knife to make four vertical cuts, about a half an inch deep, into the lower half of the root ball (about half way down the side and across the bottom). Place the plant in the hole and ensure that it is planted at the proper height. The first major root flare should be just below the surface of the soil. Not deeper (the roots may suffocate).
Planting Balled and Burlapped Trees and Shrubs. Set the root ball into the hole and check to see if the planting height is correct. The first major root flare should end up just below the surface of the finished soil level. Note that the burlap is usually tied around the trunk at a point much higher than the original soil level. Once the root ball is at the proper height, cut the strings and fold the top part of the burlap down the side of the root ball. Do not try to remove the burlap – the root ball can easily fall apart. Be sure to remove all twine or wire from around the trunk and top of the root ball.

4.  Backfilling. Once your container or balled and burlapped plant is in place, fill the hole gently, but firmly, making sure that all gaps and air spaces are filled with soil. Good, rich native soil is best, but very poor soils can be amended with compost or rotted manure. Add a few handfuls of bone meal to the backfill soil and mix well; it will help promote new root growth. Do not apply a high nitrogen fertilizer at planting time – it may burn the roots. Wait at least three weeks before fertilizing and do not fertilize if planting after August 15th.

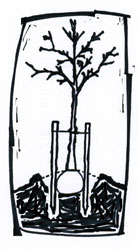
tree planted139x2505.  Staking Trees. If the tree is too tall to stand alone, it must be staked to avoid shifting in heavy wind or rain. Use two strong stakes, driven into the ground just outside the root ball. Staking must be done carefully with soft strapping material or wire padded inside old hose. Stake at the lower third of the trunk (a 12 foot tree would be staked at four feet above ground). Do not stake to rigidly – leave enough slack to allow some movement. Remove the stakes when the tree is firmly rooted – no longer than one year after planting. Staking is important. We will not guarantee any of our trees if they have not been staked.

6.  Watering. Water well, with a slow soaking to the full depth of the root ball. Build up a ring of soil to make a saucer right over the root ball. This allows good, deep irrigation with your hose on trickle, and is especially important for balled and burlapped plants. Water new plantings adequately, especially in the heat of summer. Keep the soil moist but not soaked, as over watering can cause leaves to turn yellow or fall off. When the soil is dry 3-4 inches below the surface, it is time to water.Staking Trees. If the tree is too tall to stand alone, it must be staked to avoid shifting in heavy wind or rain. Use two strong stakes, driven into the ground just outside the root ball. Staking must be done carefully with soft strapping material or wire padded inside old hose. Stake at the lower third of the trunk (a 12 foot tree would be staked at four feet above ground). Do not stake to rigidly – leave enough slack to allow some movement. Remove the stakes when the tree is firmly rooted – no longer than one year after planting. Staking is important. We will not guarantee any of our trees if they have not been staked.

mulching

    7.  Mulching. Mulch the area around the plant to at least its drip line. Ground bark (but not cedar), compost, or leaf mold is good choices. A mulch layer 3 or 4 inches thick insulates the roots from heat and cold, suppresses weeds, and reduces the amount of watering required. To avoid crown rot keep the mulch from direct contact with the lower trunk. This part of a plant likes to be high and dry.


Fall Butchart Gardens

Fall is the New Spring

Do you remember when springs were warm, and fall was a time of crisp air and the smell of burning leaves? Times have changed!  Spring is now cold and wet, with temperatures not climbing until well into June. Fall (which, in many minds starts after Labour Day!) has been longer and warmer, with dry air and a slower more beautiful burnishing of foliage.

Here on the west coast, autumn is a great time to plant shrubs, perennials, and most trees.  Even as air temperatures cool at the end of summer, soil temperatures remain warm.. Root growth continues until the soil goes below 5 degrees C (40 degrees F), and in our part of the country it is well into November or December before this happens. Fall plantings  begin to establish themselves and are ready for new growth in spring.

When digging the warm dry soil at this time of year, it’s a good idea to fill the planting hole with water, let it drain, then place the soaked root ball into the hole, ensuring a moist root run. If the soil is really dry, turn it over few times and soak the whole area with the hose.  As the Head Gardener of your plot of land, you don’t have to worry about watering, as fall plantings have the benefit of regular rainfall for about 6 months.  Plus, they don’t have to contend with heat and drought until they have put some roots down.

We all know the hazards of walking on wet soil, compacting it and annoying those hard working earthworms, so save the worms and be kind to the soil by doing as much as possible in the autumn when the soil is drier. The leaf litter in the spring often harbors hibernating bumble bees and other treasured pollinators, so the longer you can postpone the disturbance of soil in the early months of the year, the happier the bees will be.

Agastache ‘Blue Fortune’

Dividing perennials is best done in fall, but ornamental grasses should wait until spring, when active growth has started.   Late fall and early winter are great times to move deciduous shrubs and trees as well as many evergreens.  Marginally hardy plants should NOT be moved in the fall.   Be sure to stake larger plants to protect them from wind rock that can damage emerging roots.

So far, all the reasons given for fall planting have focused on the plants, but let’s give gardeners our due, and recognize that perhaps fall is a better time for us as well!

In the warm days of fall, the ground is dry and the air calm. It rarely rains.  We don’t need boots and rain gear.  A quiet afternoon in September or October, shovel in hand, sounds pretty close to Paradise, does it not? OK, we miss the aroma of burning leaves, but enjoy them as mulch instead, as we top dress the newly planted beds.

Happy autumn to one and all, may we have several more weeks of sunshine as we move into the new spring, called fall.