Microgreens are the New Kale

By Faye
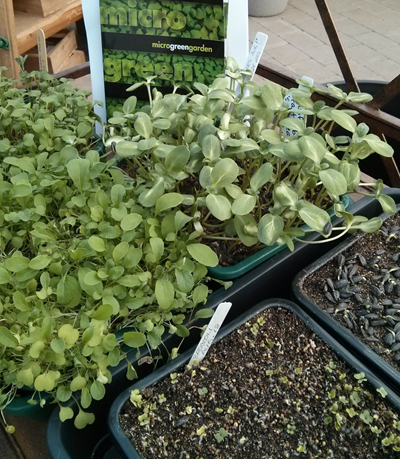
Microgreens
For the past couple of years, we’ve been inundated with the wonders of kale as the latest superfood. Recently however, while putting out trays of winter veggie starts, I have heard whispered confessions, “Actually, I don’t really like kale. “
Enter a new way to grow and eat the very freshest produce possible with a huge nutritional kick — microgreens.
Microgreens are simply any edible leaf, grown to either cotyledon (seed leaf) stage, or first/second set of true leaves, up to 2” tall. They can be grown anytime, anywhere, and can be cut at whatever stage you find most pleasing, generally within 4 weeks of sowing, sometimes as early as 5 days, depending on the crop you have chosen.
While sprouts are usually grown in dark, moist conditions and eaten just after germination, microgreens are grown in sterile seed-starting mix, brightly lit after germination, and it’s the leaf that is eaten, not the root or seed.
These tiny greens are loaded with phytonutrients, from the Greek word ‘phyto’ meaning ‘plant’. When they are exposed to light, they develop chlorophyll, which is antiseptic and anti-inflammatory. Many sources say that microgreens promote good health, fight disease and even cure illness. It is claimed that broccoli microgreens have 50 times the cancer-fighting benefits of mature broccoli! Certainly do your own research, then enjoy the fresh taste of a variety of greens.
One of the two books we have on this subject, Microgreens; How to Grow Nature’s Own Superfood, by Fionna Hill is full of intriguing recipes, and much information on each individual crop, beautifully presented.
The other one is arguably the best instructional book I’ve ever read, in a very straightforward and clear format. Microgreen Garden by Mark Mathew Braunstein.

Arugula seeds: 48 hrs
What to Grow?
Any edible leaf makes a good microgreen, with the exception of spinach, as it has a very tough and prickly casing on the seed. To get started, just use up some of your leftover (untreated) veggie seeds, but to really get into it buy the larger bags especially packaged for microgreens. West Coast Seeds offers broccoli, chard, arugula, sunflower, as well as 2- and 3-week blends mixing seeds that all mature at about the same time. We’ve found that plants that are normally eaten for their leaves when mature, eg arugula, chard, leaf mustards, kale etc, are good at all stages, whereas sunflower and broccoli not being leaf crops, are tastier at the cotyledon stage.
How, Where and When
All that’s needed is very good light, a shallow container with drainage holes, a tray to set this in, and sterile seed starting mix. We like the Garland line of plastic containers and trays as they are food grade and sturdy. It’s important to follow Food Safe rules, as the microgreens are cut close to the soil line. Be sure your containers and starting mix are pristine, and use clean scissors to harvest your greens.
Moisten the soil in a clean bucket before putting it into the container. Fill to the top and pat down with your hands, then sprinkle the seed over the surface, not burying it. Seeds are spread fairly densely, but not overlapping each other, as each one needs room to germinate, sprout a stem and grow a few leaves. To ensure even humidity, many sources suggest covering with a clear plastic dome, (which are available with the containers and trays). A cheaper option is to just cover loosely with a plastic bag. Remove any covering the instant the seeds germinate, then put them under bright light. A regular fluorescent tube works just fine, but for longer-term growth it’s better to use full spectrum tubes, Sun Blaster being the one we use. Sun Blaster also makes full spectrum screw-in bulbs, which work really well in an old goose-neck desk lamp, aimed at the trays of greens.

Microgreens: Four days
Within a very few days, you’ll see two miraculous tiny shoots emerging from the seed, one a root shoot and the other a leaf unfolding. Don’t be alarmed if you notice a tuft of white; it’s not mildew, just part of the root hairs starting to grow.
This is when it gets to be fun! As you can see from the photos, it doesn’t take long to really start looking like something. Keep the lights on about 14 hours a day; you are trying to mimic sunlight, and the period of darkness is as important to your tiny plants as it is to you. We found a timer to be a wonderful help in ensuring adequate hours of light and darkness. During the summer of course, natural sunlight outside is totally sufficient, but with our low levels of light in winter it’s just not enough to make the seedlings green and strong. Growing microgreens in winter is even more satisfying, when there isn’t the summer glut of nutritious veggies.
I use my laundry room as my seeding station; I have a 4’ Sun Blaster tube suspended from the ceiling, and also a screw-in bulb in an old desk lamp, and grow nice bright greens.
Care of your crop couldn’t be simpler. All they need is water, no fertilizing required. Water from the bottom only, reducing the chance of mildew forming on the soil. Simply pour some water into the tray under your container, and the water will soak up by osmosis. After half an hour, drain away any excess water still in the tray.
Harvesting is the best part, just tilt your container over a dish and cut off as many stems as you need right then. No need to harvest the whole crop at once; another wave of greens will grow in after the first cutting, as not all seeds germinate at the same time. Some stems will sprout new growth as well. Often there are 2-3 waves of new growth, so don’t be in a hurry to toss your soil; just keep watering.
The latest in gourmet greens are fun to do, they will nourish both body and spirit. Also remember that growing your kale outside is still an option!


