Planting Guide for Bare Root Roses
Bare root roses are an excellent way to establish a new rose in your garden. Follow these 5 easy steps to ensure your rose gets off to a great start.
Before Planting – If you cannot plant right away, keep the roots covered in soil or mulch and keep watered to ensure they don’t dry out.
Step 1 – Remove the elastic bands
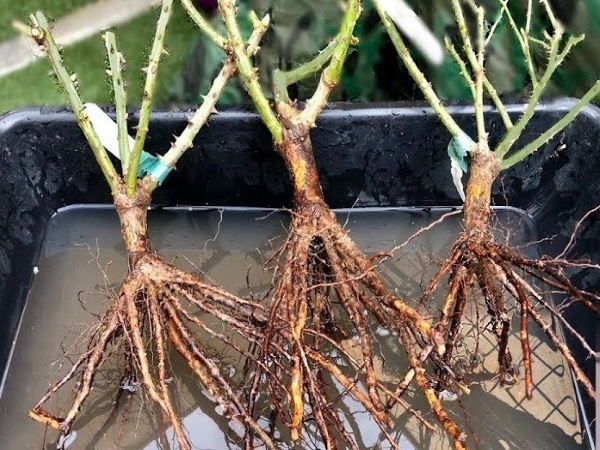
The roots are wrapped in elastic bands for transport, these need to be removed before planting!
Step 2 – Rehydrate the rose
Submerge the rose roots in a bucket of water for at least 30 minutes to allow the rose to rehydrate before planting.
Step 3 – Prepare the hole
Dig a large hole, approximately 2’ wide by 2’ deep. Make sure to loosen soil up at the bottom of the hole. If existing soil is poor quality, make sure to add a good quality garden soil when planting. This is also the time to add bone meal and rose fertilizer to ensure strong growth in the first season. If adding rose fertilizer sprinkle in the bottom of the hole and add soil on top to prevent the roots from coming in direct contact with the fertilizer.
Step 4 – Planting the rose
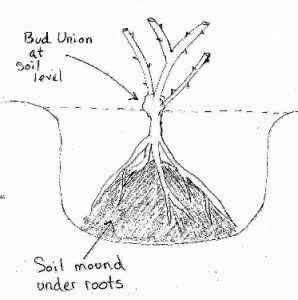
Fig 1. Planting depth for bare root roses in the Pacific Northwest.
Mound soil in the centre of the hole so that the roots lay on top of the mound of soil. This will help to prevent any air pockets from forming.
If adding new soil, make sure to mix it in with the existing soil so that the change in soil type is gradual for the plant as it grows.
Plant the rose so that the bud union is at, or just slightly below, ground level. The bud union is the swollen area where the stems arise from the root stock.
Fill in hole with soil about half way making sure there are no air pockets and water thoroughly. Once water has drained fill in the rest of the hole with soil and water generously.
Step 5 – After Care
Make sure to keep the rose well watered, especially in the first year. Roses are heavy feeders and will benefit from regular fertilizing.

